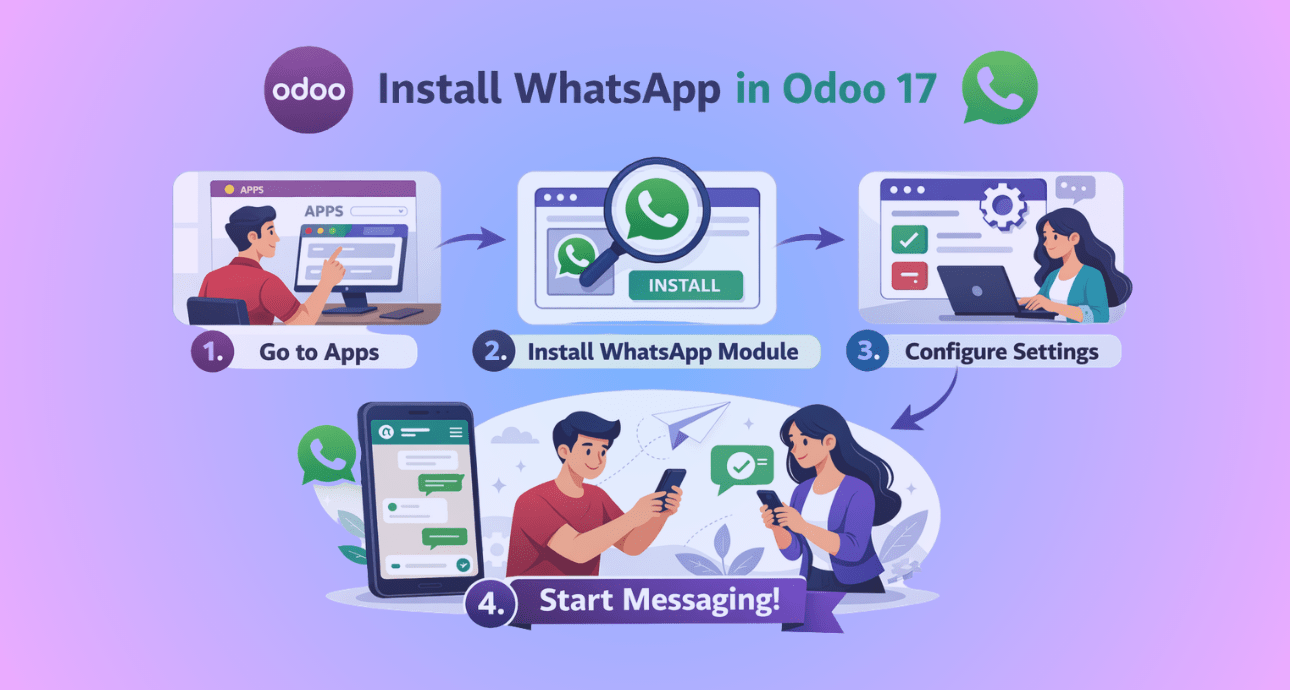
It’s simple to integrate WhatsApp with Odoo 17 for improved communication. Observe the thorough guidelines to:
- Set up WhatsApp in Meta
- Set up WhatsApp on Odoo
It only takes a few hours to set everything up, so you can start taking advantage of the speedy and effective communication that the integration offers.
Step-by-step instructions:
An organization can link a WhatsApp Business Account (WABA) to an Odoo database using the Odoo WhatsApp app. This enables the following features:
- Utilize an Odoo database to directly receive and respond to WhatsApp messages.
- Make fresh templates using variables and dynamic placeholders.
- Provide pre-approved templates with dynamic variables, like the following:
1. Quotes from the Sales application
2. Invoices and receipts generated by the Point of Sale app
3. Using the Events app to purchase tickets
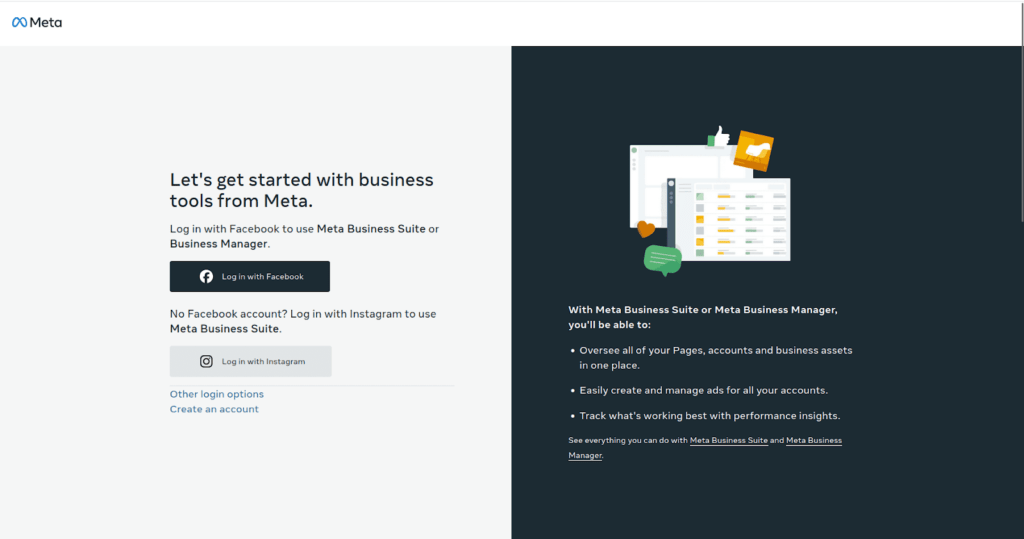
Setup a Meta Business Account
To create a Business account with Meta (owner of Facebook) navigate to: Facebook Business Manager
Click “Create account” to get started, then provide the administrator’s name, the business name, and a working email address.
After that, click Next to bring up a pop-up box asking you to verify your email address. When you’re done verifying, click Done to shut the window.
After that, adhere to the directions provided in the Facebook email to finalize the setup and validate the establishment of the business account.
Go to https://www.facebook.com/business/help/1710077379203657?id=180505742745347
to create a WhatsApp Business account.
Follow these steps to set up your WhatsApp Business Account (WABA) and link it to your Odoo database for a smooth interface with the software.
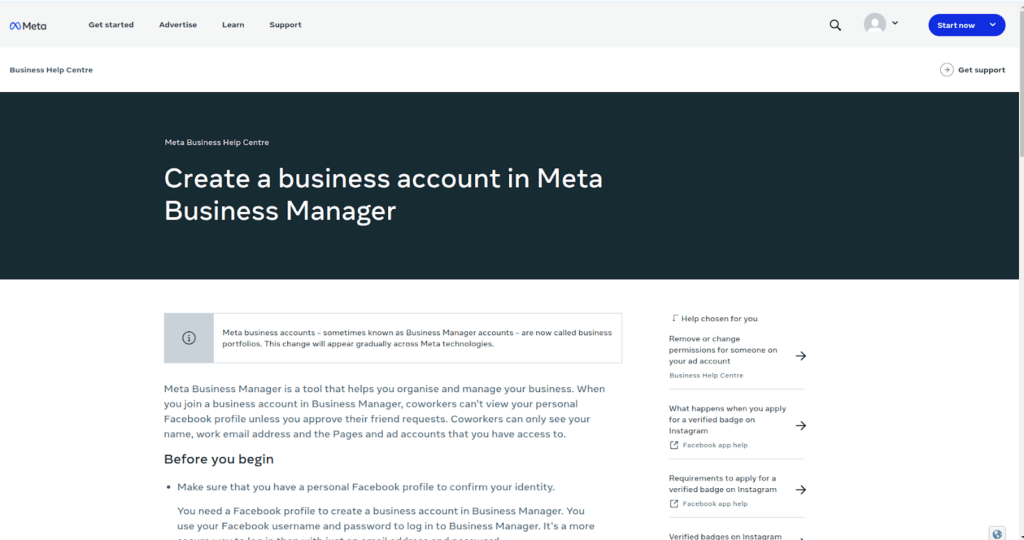
How to Open an Account for Business Use
In Business Manager, to establish a business account:
1. Visit the business.facebook.com/overview page.
2. Select “Create an account.”
3. Click Next after entering the name of your company, your name, and your work email address.
4. After entering your company’s information, click Submit.
The Developers Dashboard’s App Creation Meta is available at https://developers.facebook.com
Using your Meta developer account, go to the Meta for Developers dashboard and log in. Link a Facebook account to start the process of creating a Meta developer account if you don’t already have one.
After logging into your Meta developer account successfully, click My Apps in the upper right corner. The administrator will be redirected to each and every app that the developer has set up in this particular developer account. To get started configuring a new Meta application, click Create App.
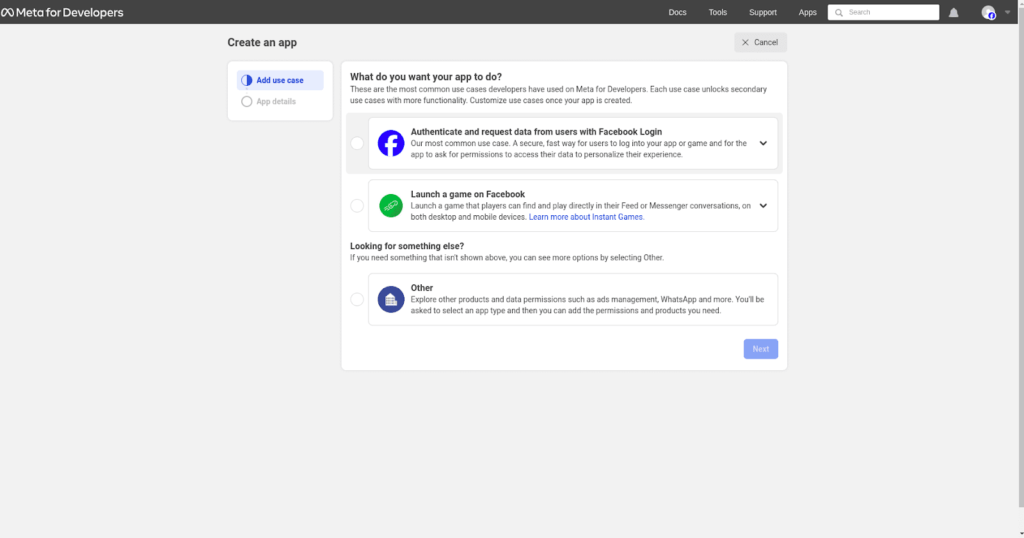
Select the ‘Other’ option and click ‘Next’ to continue.
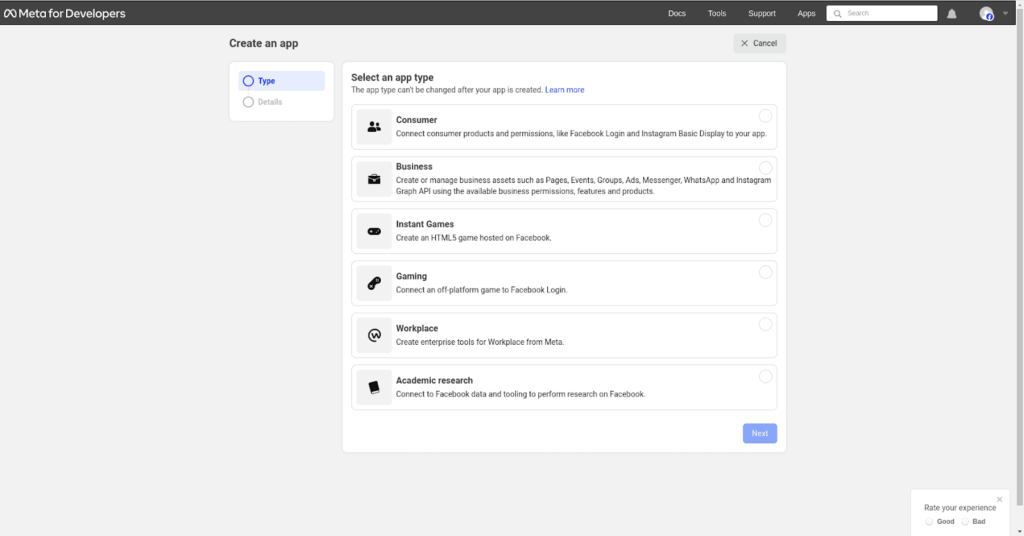
Application type
Select Other from the “Looking for something else?” option on the “Create an app” page. Click Next to be taken to a different page where you may choose the app type. Next, select Business, the first choice displayed under the Select an app type heading. The WhatsApp API can be created and managed with this pick.
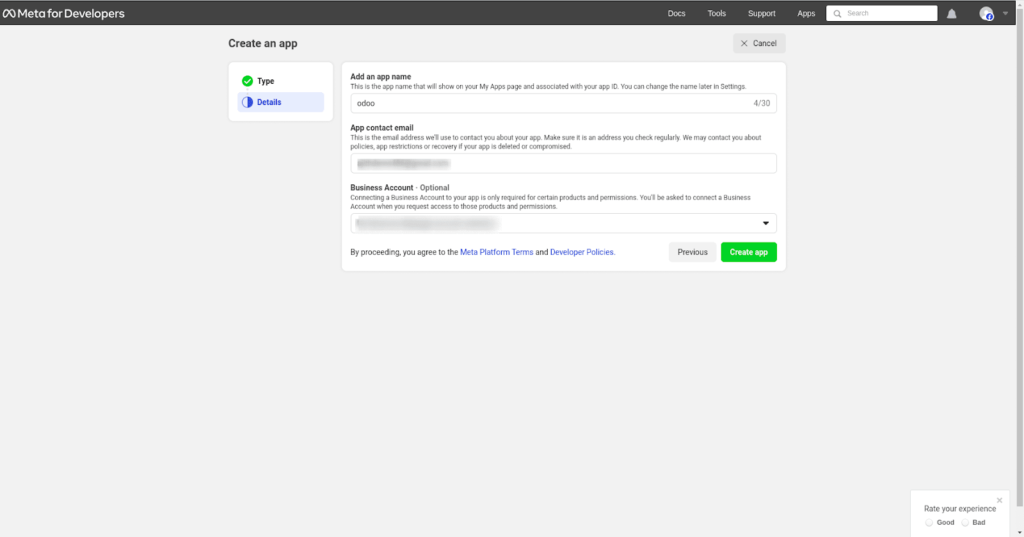
Details of the App
Enter Odoo in the space labeled “Add an App name” on the Details part of the Create an App procedure.
Next, fill in the developer’s email address in the App contact email label area.
Finally, use the drop-down box to select the Meta business account profile in the Business Account – Optional area. Click Create app to complete.
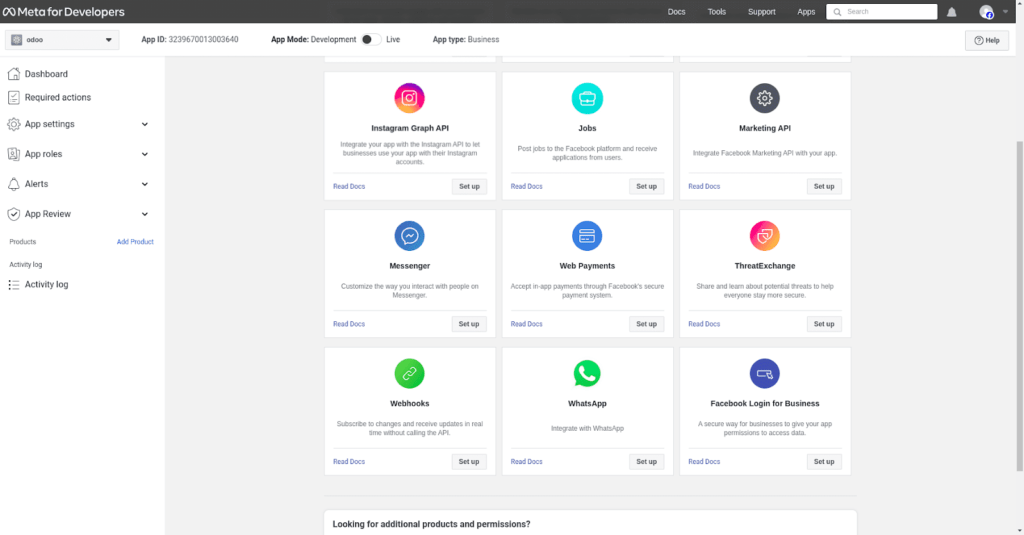
How to Include a Product on WhatsApp in the App
The next stage is to add a product to the app after the basic structure has been established. To start this process, go to https://developers.facebook.com/apps, choose the app that is being setup, and you will be able to view the Meta app dashboard.”
Go to the following page and, assuming that WhatsApp will be used, select ‘Set up’ by clicking the box next to WhatsApp, which is near the bottom of the page.
After that, the page takes users to the WhatsApp Business Platform API settings page. Click Continue to confirm your selection after using the drop-down menu to choose the Meta business that needs to be configured for the Choose a Meta Business Account option.
Utilize the WhatsApp API now.
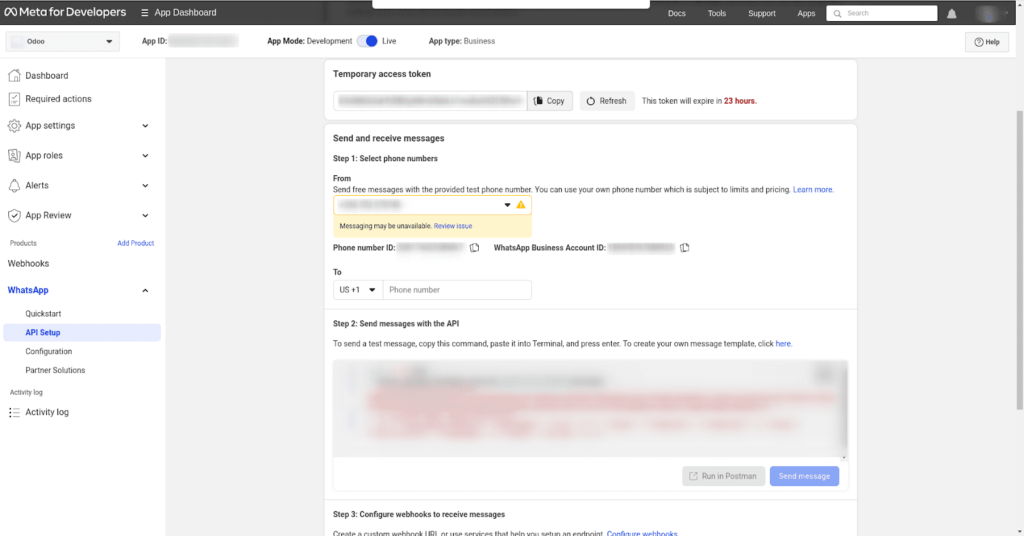
After choosing “Continue” to end the previous WhatsApp product wizard, the browser ought to reroute to the WhatsApp Quickstart page. The setup process for the WhatsApp API begins with this Quickstart page, where you can add a phone number and send a test message before anything else.
Ways to Set Up WhatsApp in Odoo
Go to the settings or configuration section of your Odoo instance to set up WhatsApp. Find the WhatsApp integration options and provide the required information, including your Business API credentials. To facilitate smooth WhatsApp communication within the Odoo platform, make sure the setup fits your company’s goals and demands. Then, save the settings.
| Phone | Phone number ID | Phone Number ID |
| Name | Meta Console | Odoo Interface |
| Token | Temporary access token | Access Token |
| App ID | App ID | App ID |
| Account ID | WhatsApp Business Account ID | Account ID |
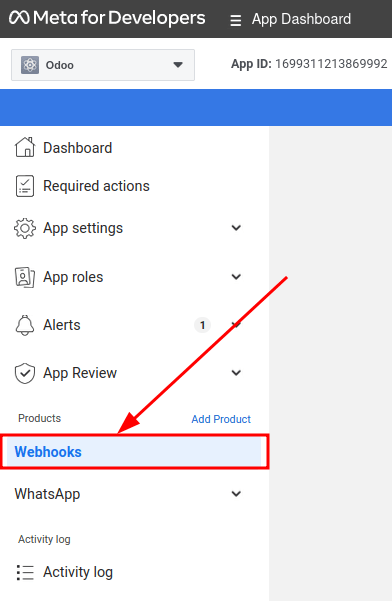
Setting up webhooks
Go to https://developers.facebook.com/apps and choose the app that Odoo is being configured in to configure the webhooks for WhatsApp. Next, select the API Setup menu item by clicking under the WhatsApp menu heading on the left side of the screen.
Click Edit on the Webhook setup page to add the Callback URL and Webhook Verify Token data from Odoo.
Go to the WhatsApp app in a separate browser window to get the required values in Odoo. Navigate to Settings ‣ WhatsApp Business Accounts and choose the account that has to be adjusted. Look for the values in the Receiving Messages section.
The Callback URL from Odoo should be copied and pasted into the Callback URL column in Meta. In a similar manner, duplicate and insert the Webhook Verify Token into the Meta developer console’s Verify Token field.
In order to save the values in the Meta developer console, click Verify at the end.
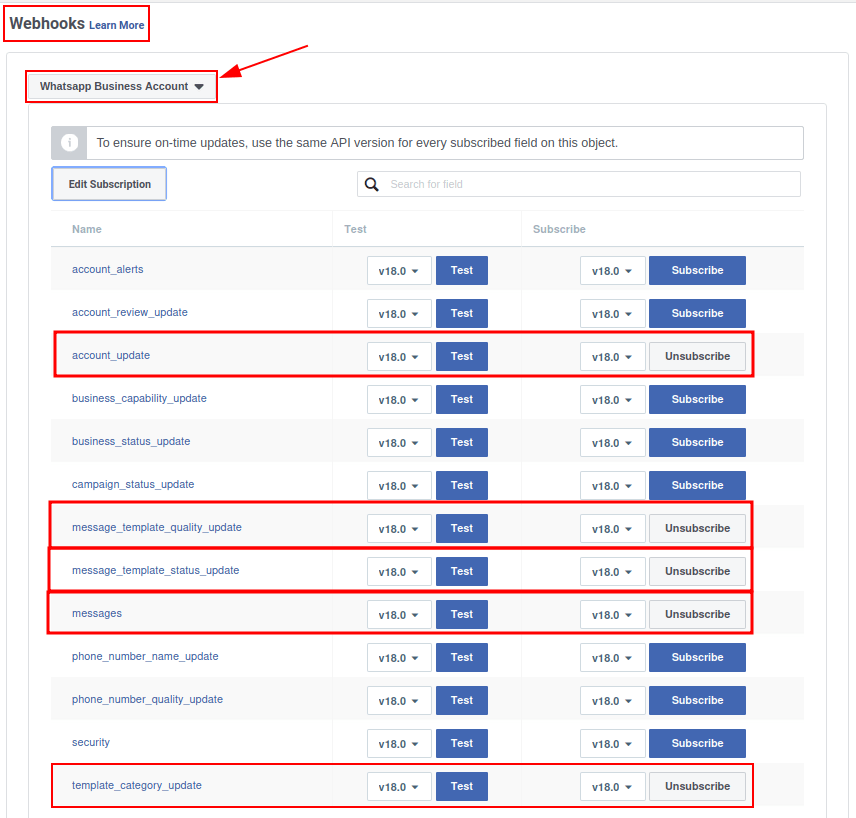
Webhook fields
Now enter each webhook field individually in the Webhook fields section of Meta’s developer console:
WhatsApp Templates
WhatsApp templates are pre-written messages from the database that are sent out regularly. They free users from constantly needing to write the same message in order to send effective communications.
Users are able to select the appropriate message for the proper audience by creating several templates that are customized for different scenarios. As a result, the communication is of higher quality and the client engagement rate is raised overall.
You may make WhatsApp templates on the Meta and Odoo interfaces. The steps for making templates in Odoo and later in Meta are summarized in the method that follows.
Making Odoo templates
Go to the WhatsApp app ‣ Templates dashboard in order to access and create WhatsApp templates.
Three tabs, Body, Buttons, and Variables, are located at the bottom of each template form; these tabs when combined form the WhatsApp template.
The text is entered into the Body tab, and dynamic content that is called out in the Body tab is specified in the Variables tab. Every piece of dynamic content (e.g., placeholders) in the message (body) is specifically called out and specified in the Variables tab.
Templates are pre-designed layouts that enable users to send polished, professional messages to customers. These templates can incorporate dynamic data, which is populated in the final message through variables defined during the template setup. For instance, you can include the recipient’s name, highlight specific products, or reference a sales order, among other useful and effective variables.
To create a WhatsApp template, navigate to the WhatsApp app ‣ Templates dashboard and click “New.” On the form, enter a Name for the template, and select a Language.
Syncing Templates
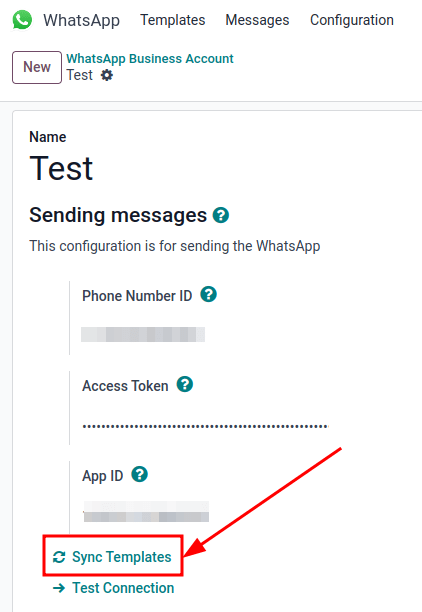
Once templates are approved by the Meta team, they must be synced with the Odoo database. To sync the templates, navigate to the WhatsApp app ‣ Configuration ‣ WhatsApp Business Accounts, and select the configuration that needs to be synced. In the Sending messages section at the bottom, click on “Sync Templates.” Meta will then update the approved templates, making them available for use across various apps in the database.
A successful message in green appears in the upper-right corner with the number of templates updated.
Creating templates in Meta
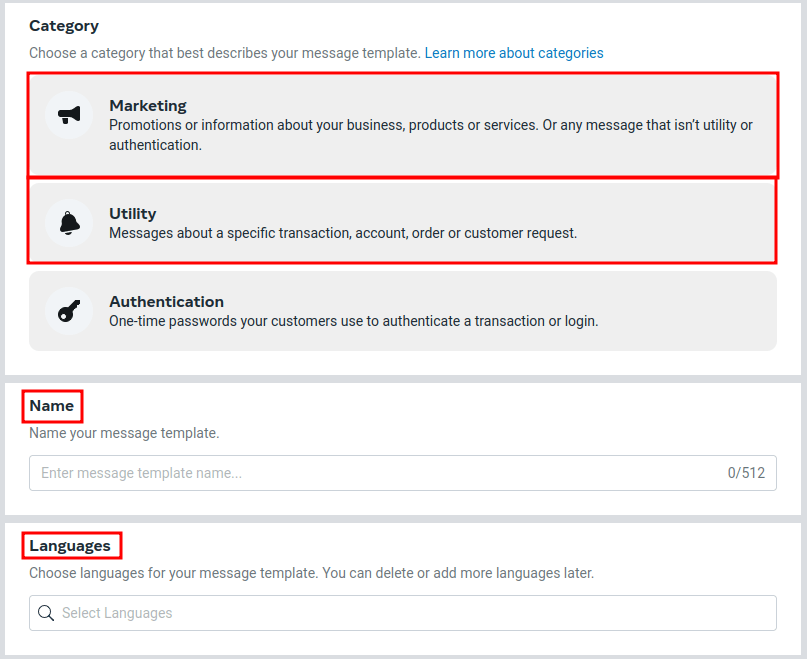
Click the blue “Create template” button and choose the Category to start creating a WhatsApp template. Authentication, Utility, and Marketing are among the choices mentioned. Unless the user requests a password reset or other security-related communication, the first two alternatives will often be used.
After entering the template’s name, choose the template’s language.
The template’s status will stay in “In review” until Meta makes a decision. The templates must be synced from within the Odoo database after receiving an email confirming their approval.
Alerts
Notifications in WhatsApp function similarly to an Odoo message exchange. The customer communication that was received pops up in a new window. Notifications are enabled by default in the Odoo WhatsApp business account configuration.
Go to WhatsApp app ‣ Configuration ‣ WhatsApp Business Accounts to change the notification settings. Choose the account from there, then scroll down to the Control area to manage notifications. Enter the user or users you want to receive notifications for this specific WhatsApp channel in the area under the Notify users heading.
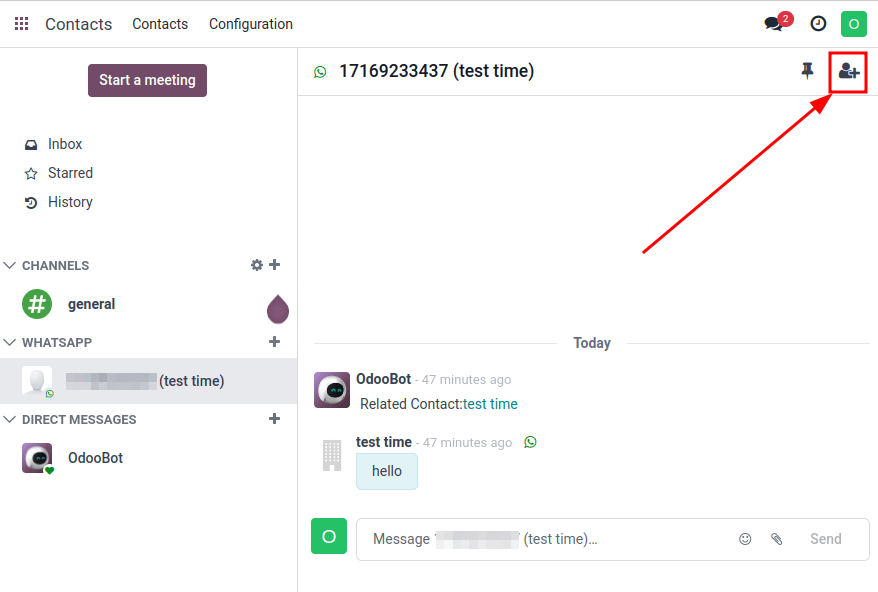
Including others in the chat
By opening the WhatsApp pop-up window, users can be added to a chat. Discussions on WhatsApp can be found via the Discuss app. A box inviting users to join the conversation displays when you click on the  + (add user) symbol next to it.