Step-by-step Guide for Help Desk in Odoo
Odoo website support and help desk for happy customers!
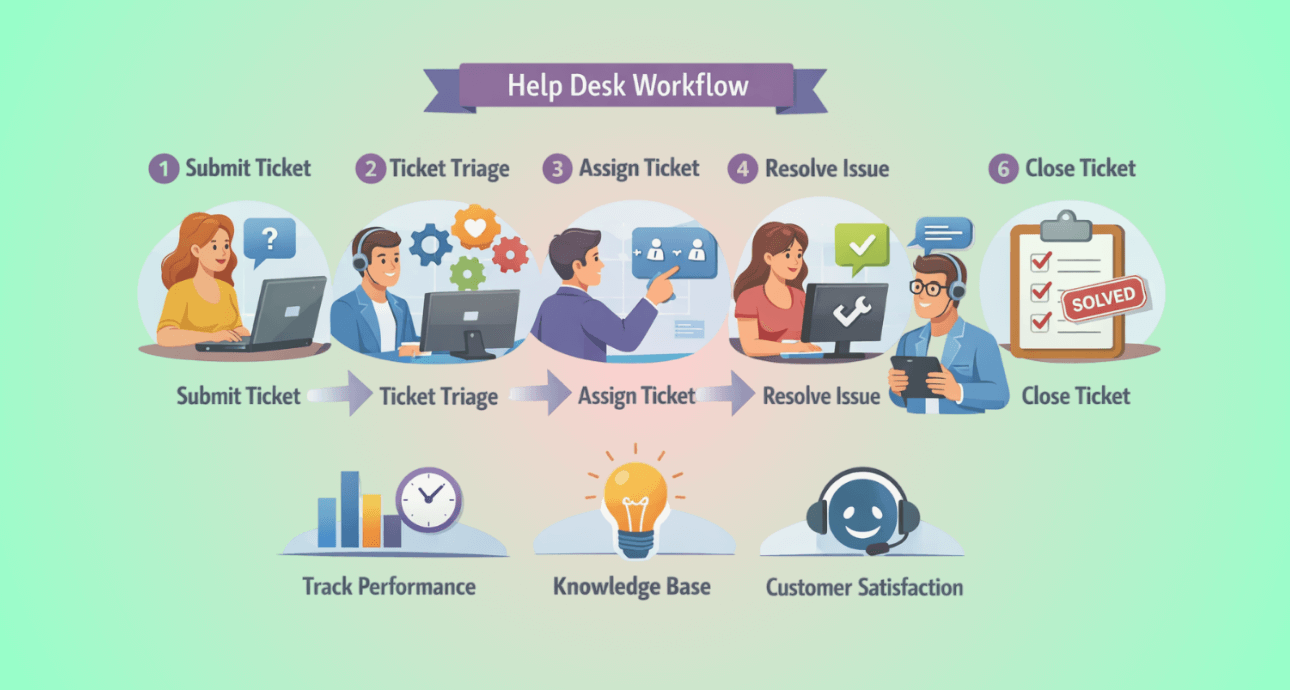
In order to give clients with after-sale support, an organizational structure must have a customer support system. Additionally, it contributes to giving the user a positive experience and demonstrates their trust in your website or business.
We developed the Odoo Support System and Odoo Website Helpdesk to make your client support easier. Registered users can submit support tickets from your Odoo website for questions or complaints using the Odoo app.
Customers can also choose why they would like to open a support ticket. In the Odoo backend, the user can view support tickets and respond to them appropriately. Additionally, you can configure different ticket categories and teams from the backend.
Customers can also track their progress and examine all of their support tickets from their accounts.
Workflow:
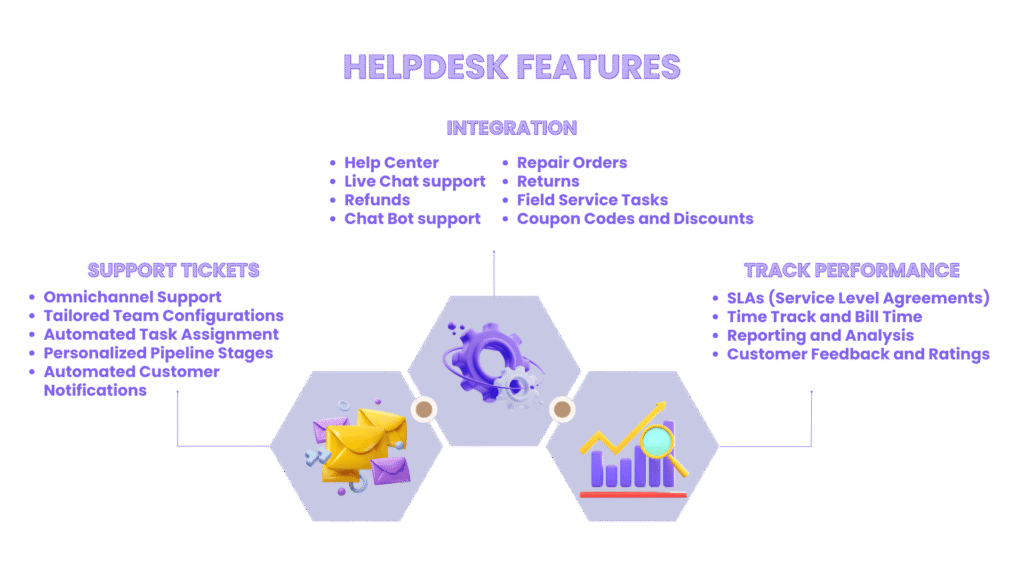
We will look at some main aspects of Odoo Helpdesk and Support system:
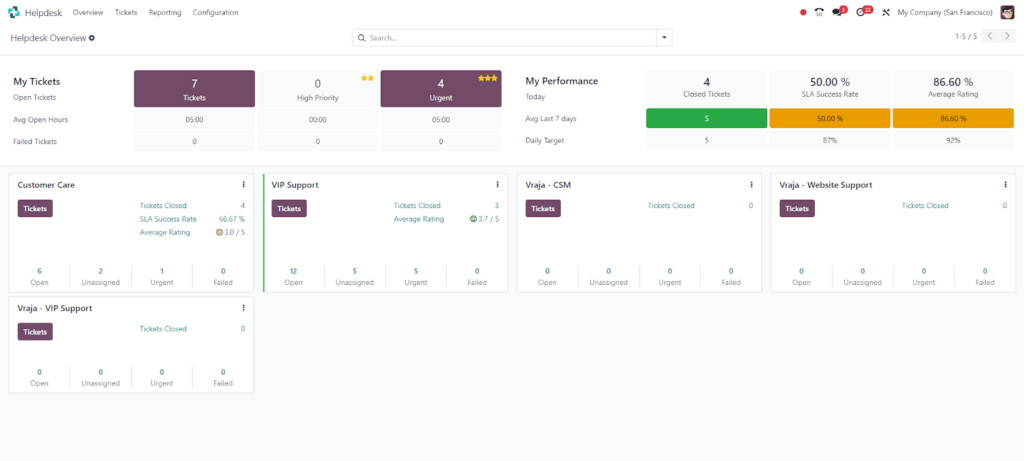
Helpdesk Dashboard:
Dashboard Overview is the initial page that appears after we install and launch the program.
The dashboard provides a clear picture of the teams, the open tickets with the teams, and the SLA that we have maintained. A comprehensive understanding of the support team’s situation and the necessary measures can be obtained by keeping an eye on the dashboard.
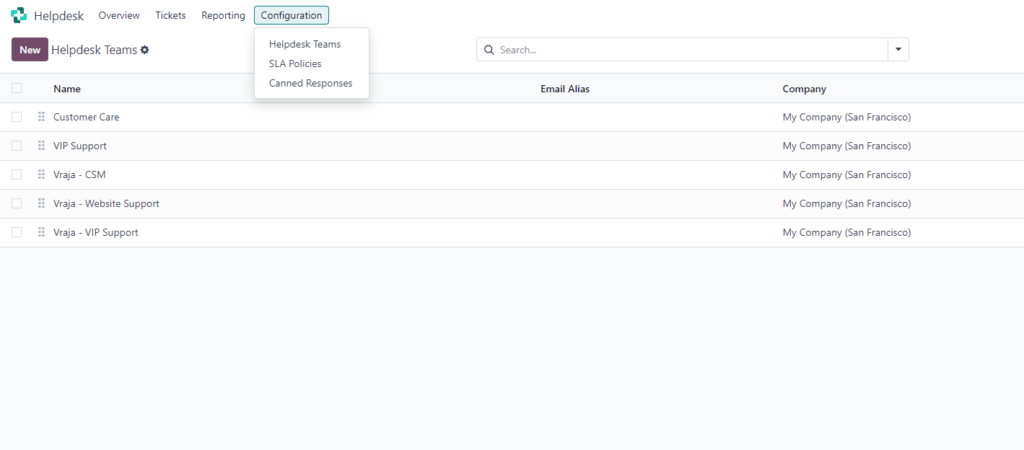
Create Helpdesk Teams:
Creating numerous teams makes it possible to organize tickets according to support type or region.
Navigate to Helpdesk ‣ Configuration ‣ Teams to view or edit Helpdesk teams.
Click the New button located in the upper left corner of the dashboard to form a new team. Next, give the new team a name and complete the remaining fields on the form according to the guidelines in the subsequent sections.
The team description is published on the public facing website form, where customers and portal users submit tickets. The description included in this field should not include any information that is for internal use only.
Assignment & Team Visibility
The internal users and portal users who have access to this team and its tickets can be changed by adjusting the Visibility settings. Users are assigned to handle each ticket differently depending on the Assignment parameters.
Identify the team’s visibility.
To choose who can see this team and its tickets, choose one of the following choices under the Visibility section:
1. Internal users who have been invited (private) have access to the team and the tickets they are tracking. By adding or removing a follower, each ticket’s access can be changed separately. Once internal users are added as followers to a specific issue or to the team, they are deemed invited.
2. The team and all of its tickets are accessible to all internal users (company).
3. All internal users, both public and invited to the portal, have access to the team and all of its tickets. Only the tickets that they are following are accessible to portal users.
Assign new tickets automatically
Tickets must be assigned to a team member as soon as they are received. Either manually or automatically, based on each ticket separately, this is accomplished. To make this option available to the team, tick the Automatic Assignment checkbox.
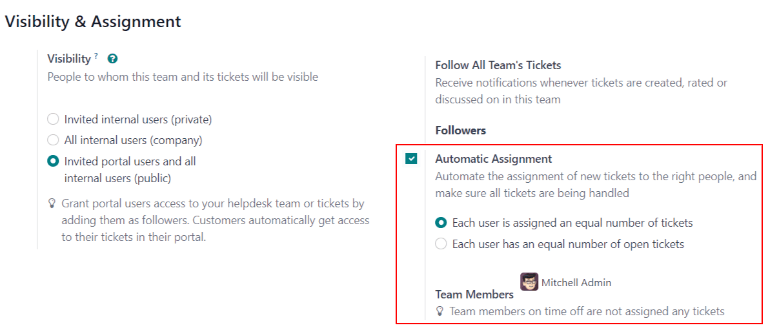
More fields show up as soon as Automatic Assignment is enabled.
Depending on how the team should divide up the workload, choose one of the following assignment strategies:
1. No matter how many open or closed tickets a team member is currently assigned, their ticket count is determined by the overall number of tickets assigned to them. Each user is given an equal number of tickets.
2. Every user has an equal amount of open tickets; team members are allotted tickets according to the quantity of open tickets they currently have.
Add the team members who will receive tickets given to them at the end. To include all employees who have the appropriate access privileges and assignments set up in their user account settings, leave the box empty.
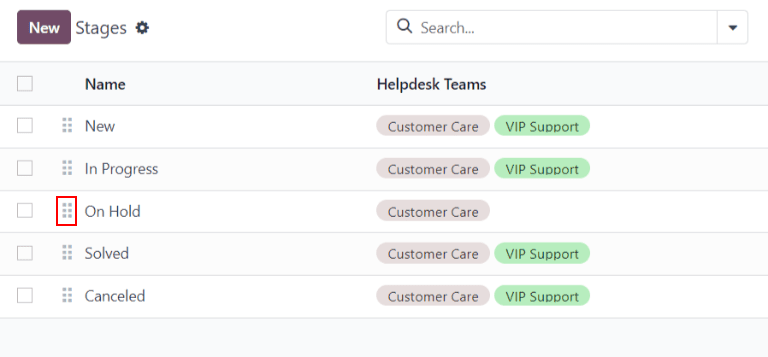
Create / Modify Stages
The Helpdesk pipeline is arranged using stages, which are also used to monitor ticket progress. The names of the stages can be changed to suit the requirements of any team.
Navigate to Helpdesk app ‣ Configuration ‣ Stages to view or edit the Helpdesk stages.
The stages that are currently accessible in Helpdesk are shown in the default list view on the Stages page. They are enumerated in the pipeline’s sequence of appearance.
Click the (drag) icon to the left of the stage name and drag it to the desired location on the list to rearrange the order of the stages.
Click the New button in the upper-left corner of the stage list to start a new stage. This exposes a stage form that is blank.
Give the new stage a name and, if you’d like, a description. Next, fill in the remaining fields by following the instructions below.
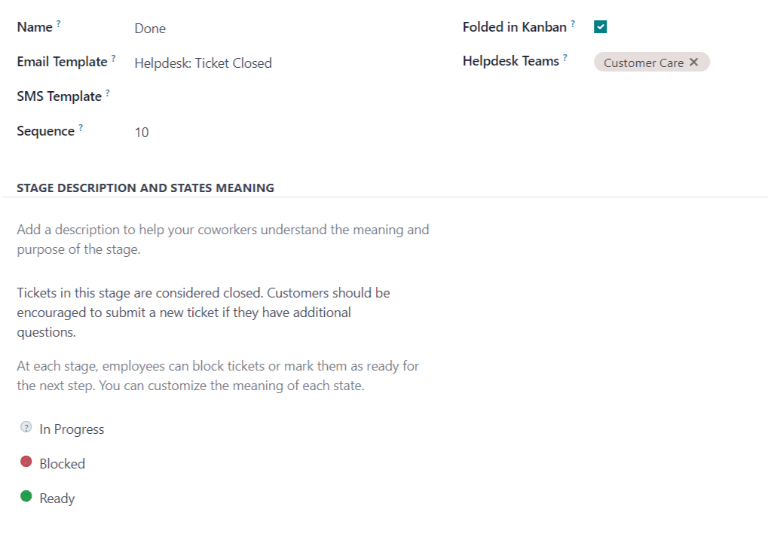
Stages should include email and SMS templates
An email is automatically sent to the customer when a ticket reaches a particular step in the pipeline when an Email Template is applied to that stage. Similarly, sending an SMS text message to a consumer is triggered by adding an SMS template.
Assign Stages to the Team
On the Stages form, pick the Helpdesk Teams area. Since different teams might be assigned to the same stage, more than one team may be chosen.
Fold a Stage
Stages are displayed in the Kanban view of either tickets dashboard by default: You may access your tickets by going to Helpdesk app ‣ Tickets ‣ My Tickets or Helpdesk app ‣ Tickets ‣ All Tickets.
Tickets in an unfolded stage are regarded as open and are visible in the pipeline under the stage name.
In the Kanban view of a ticket page (My Tickets or All Tickets), stages can be set up to be folded.
The tickets within the stage are no longer immediately visible, but the names of the folded stages are still apparent.
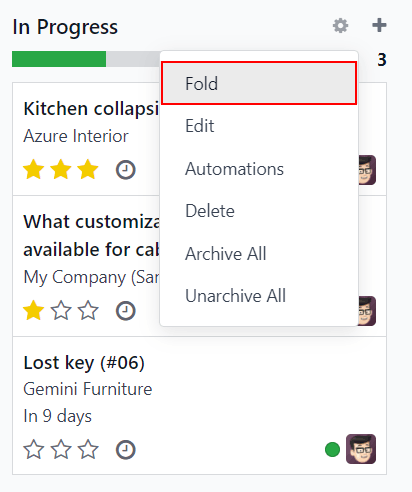
In the tickets pipeline’s Kanban view, stages can also be momentarily folded.
To access a particular team’s pipeline, go to the Helpdesk app and select the team’s Kanban card.To temporarily fold a stage, first choose it, then click the (gear) symbol and choose Fold from the drop-down menu.
Combine tickets
The merge feature in Helpdesk can be used to merge multiple tickets into a single ticket if they are discovered.
Go to the Helpdesk app ‣ Tickets ‣ All Tickets to combine two or more tickets. Select the tickets that need to be combined by checking the box located on the far left of each one. Then, choose Merge from the drop-down menu by clicking the Actions symbol. By doing this, a new page containing the chosen tickets and their Similarity rating is displayed. Click DISCARD or Merge to combine the tickets from this point on.
Receiving Tickets
Customers can contact Odoo Helpdesk through a variety of channels, including email, live chat, and a website form, to request support. The range of these contact options not only gives customers more ways to get help fast, but it also makes it possible for the support team to handle multi-channel support tickets from a single, central place.
Allow channel choices for ticket submission.
Select an existing team by going to Helpdesk app ‣ Configuration ‣ Helpdesk Teams, or click New to start a new team.
Navigate down to the Channels and Help Center sections on the team’s settings page. By ticking the corresponding boxes, you can enable one or more channels.
1. By email
2. Real-time conversation
3. Form for Website
By Email:
Messages sent to the designated email alias for that team generate tickets when the Email Alias feature is enabled.
An email alias is made for each new Helpdesk team that is formed. On the options page for the team, you may modify this alias.
Go to the Helpdesk app ‣ Configuration ‣ Helpdesk Teams, select a team, and click to enter the team’s settings page in order to modify the email alias for that team.
After that, select Channels ‣ Email Aliases. Enter the preferred name for the team’s email alias in the Alias area.
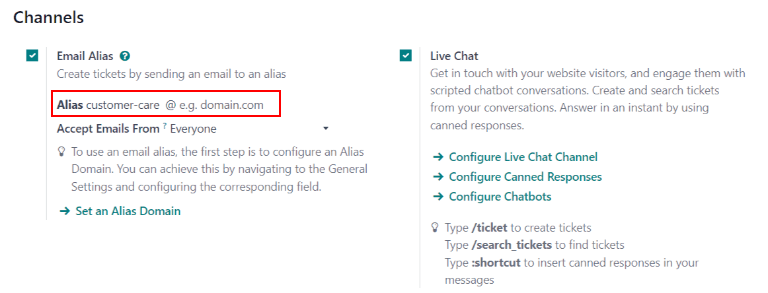
Real-time Conversation / Live Chat:
1. Operators tab
2. Options tab
3. Channel Rules tab
4. Widget tab
5. From a Live Chat conversation, open a support ticket
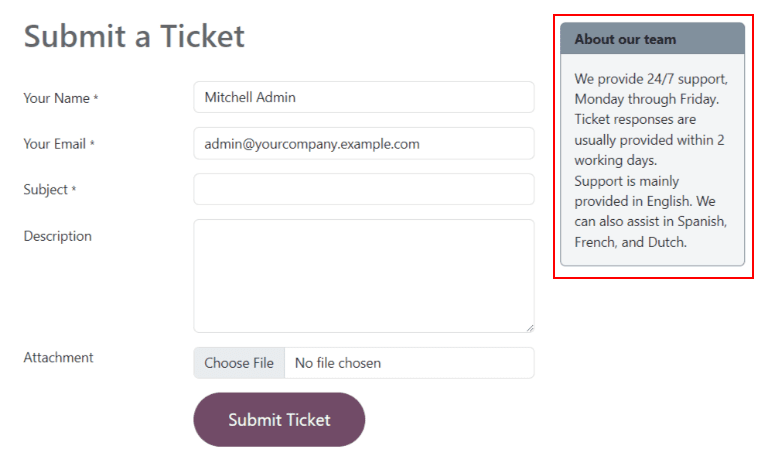
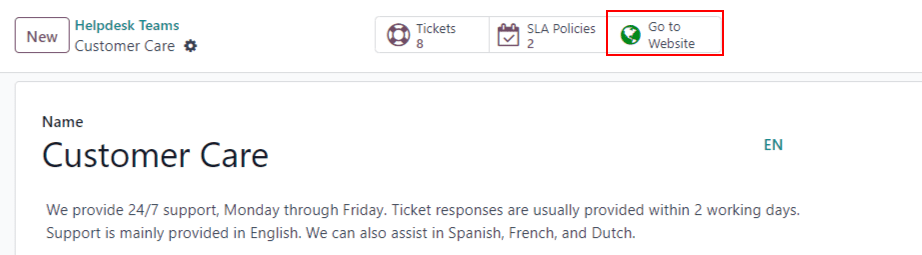
Website Form:
When the Website Form setting is enabled, a new page with an editable form is added to the website. When all needed form fields are completed and submitted, a new ticket is produced.
Go to a team’s settings page under Helpdesk app ‣ Configuration ‣ Helpdesk Teams, then choose the relevant team from the list to activate the online form.
Next, find the Website Form function in the Help Center area and select the corresponding checkbox.
Verify that the right website is entered in the Website box if there are many current websites in the database. If not, choose the appropriate option from the list.
Click the Go to Website smart button at the top of the Teams settings page to view the feature after it has been engaged.
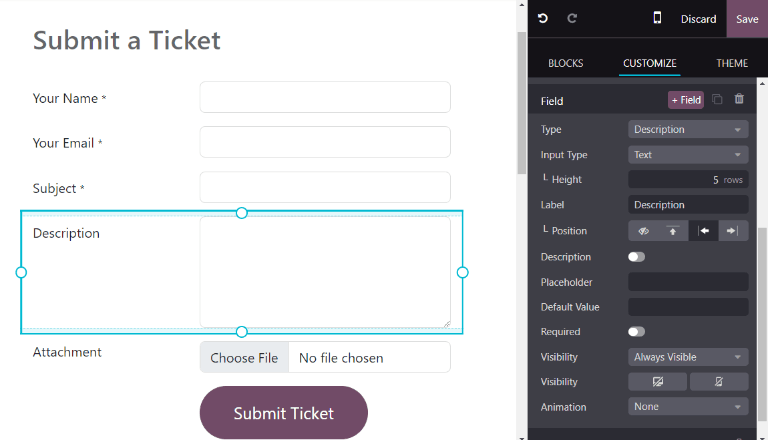
Website Form Activating the Website Form option creates a new page with an editable form on it. After completing and submitting the necessary form data, a new ticket is created.
Select the desired team from the list on the team settings page found under Helpdesk app ‣ Configuration ‣ Helpdesk Teams to activate the online form.
Next, find and verify the Website Form function under the Help Center area.
Verify the website that is shown in the Website column is the correct one if there are many active websites in the database. If not, pick the appropriate option from the list that drops down.
Once enabled, select the Go to Website smart button located at the top of the Teams settings page to observe.
Agreements on service levels (SLA)
The degree of service that a client might anticipate from a supplier is outlined in a service level agreement (SLA). SLAs give clients a schedule of when to expect outcomes and help the support team stay on task.
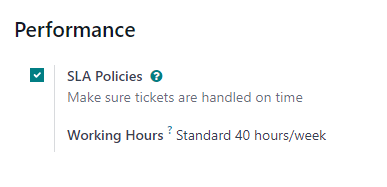
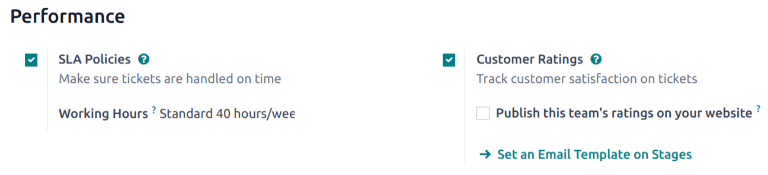
When a Helpdesk team is created, the SLA Policies feature is activated by default.
Go to Helpdesk app ‣ Configuration ‣ Helpdesk Teams to disable the feature or change the working hours. To view the setup page for a team, click on that team.
Navigate to the Performance section from this point on. Clear the SLA Policies option to disable the SLAs feature for the team.
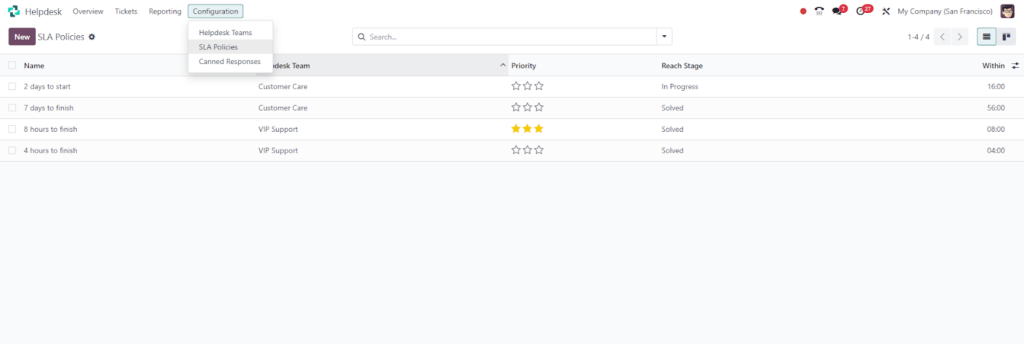
Make fresh SLA guidelines.
Click New under Helpdesk app ‣ Configuration ‣ SLA Policies to start a new policy.
As an alternative, click on a team by going to Helpdesk app ‣ Configuration ‣ Helpdesk Teams. Next, select New from the SLA Policies smart button that appears at the top of the team’s settings page.
Enter the new policy’s Title and Description on the blank SLA policy form, then follow the instructions below to complete the form.
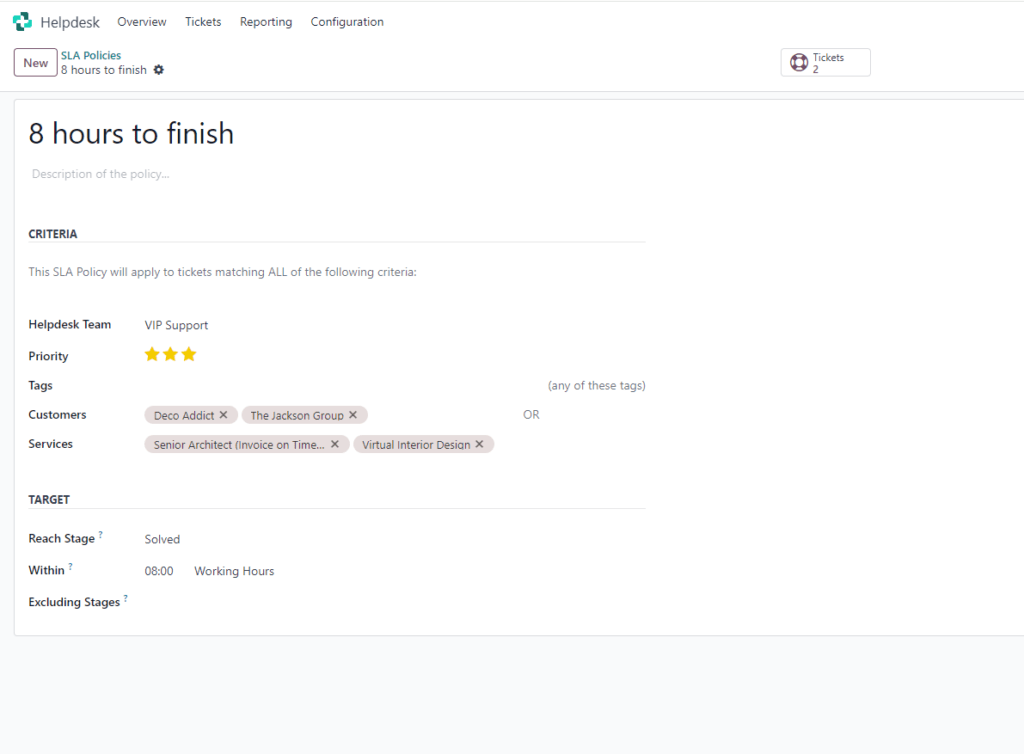
Specify the requirements for a SLA policy.
Which tickets are subject to this policy’s application is indicated in the Criteria section.
Set a goal for the SLA policy.
A target is the stage that a ticket must achieve and the amount of time given to reach it in order to meet the SLA policy’s requirements. A team may choose any stage to enter in the Reach Stage field.
The SLA deadline does not take into account time spent in stages that are chosen in the Excluding Stages field.
Meet the SLA’s deadlines.
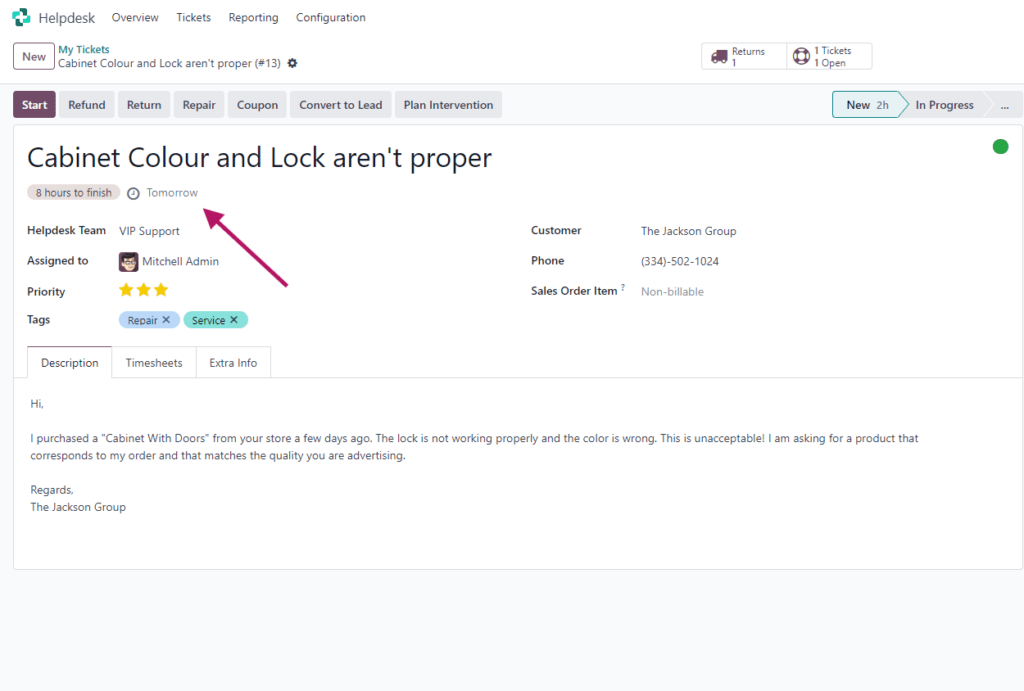
A deadline is computed as soon as it is decided that a ticket satisfies the requirements of a SLA policy. The deadline is determined by taking into account both the intended working hours and the ticket creation date.
Next, a tag with the name of the applicable SLA and the deadline are added to the ticket.
The SLA tag turns red if the SLA deadline elapses and the ticket hasn’t advanced to the Reach Stage. The red tag remains on the ticket even after it has been moved to the Reach Stage in the event that the SLA has failed.
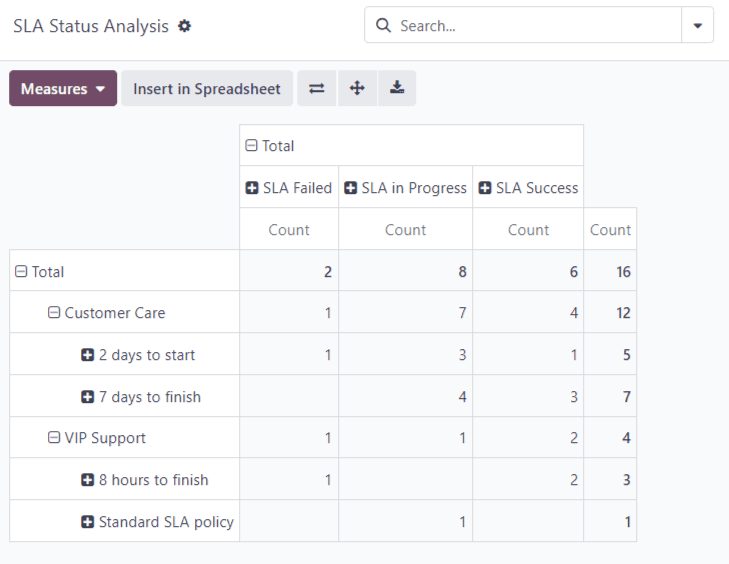
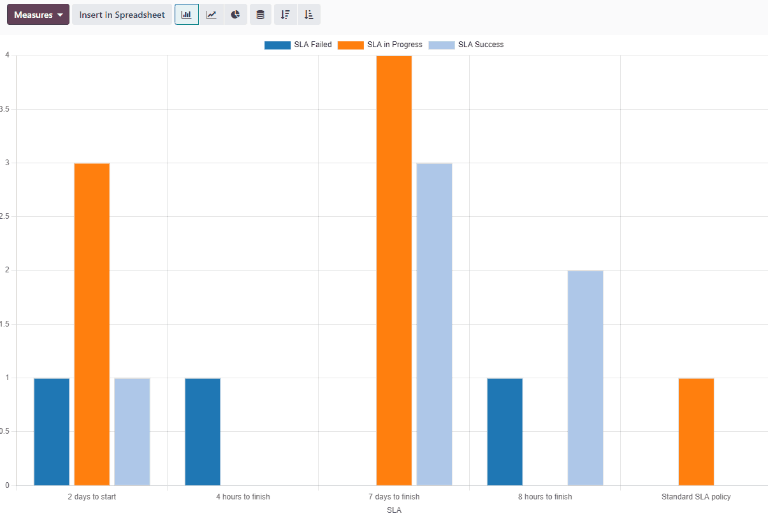
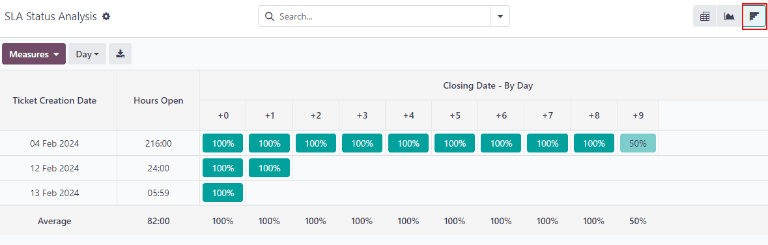
Examine the SLA’s performance
The SLA Status Analysis report monitors each team member’s performance in addition to the speed at which a SLA is completed.
Go to the Helpdesk app to access the report and related pivot table. SLA Status Analysis – Reports.
1. Pivot View:
The report opens in a Pivot view by default. Tickets that have fulfilled, are still being worked on, or failed to fulfill any SLA policies in the database are listed. They are sorted by team and ticket count by default.
2. Graph View
You can also view the SLA Status Analysis report as a Pie chart, line chart, or bar chart. To switch between these views, first click the Graph button located in the dashboard’s upper-right corner. Next, click on the relevant chart icon located at the graph’s upper-left corner.
3. Cohort View
To monitor changes in data over time, utilize the Cohort view. Click the Cohort view button to see the SLA Status Analysis report in a cohort format.
Customer Ratings
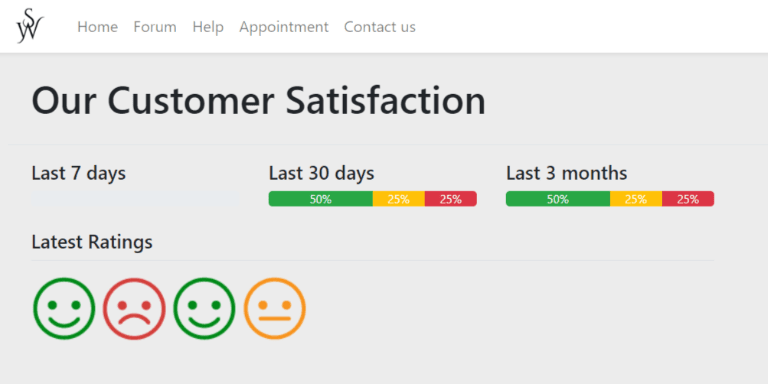
It is possible to monitor customer satisfaction and team performance by asking consumers to rate the help they received from a Helpdesk staff. Customers can get a broad picture of the team’s performance by viewing the ratings that are posted on the site.
Enable feedback from customers for Helpdesk staff.
Go to Helpdesk app ‣ Configuration ‣ Helpdesk Teams to enable customer ratings on a helpdesk team. Click on a team to bring up the settings page after selecting it from the list. Select the Customer Ratings checkbox after navigating to the Performance section.
Create a step for a ratings request email template.
An email template should be added to the relevant stage so that, when a customer’s ticket has closed, ratings are automatically requested from them.
Click the Set an Email Template on Stages link once the Customer Ratings feature has been activated on the team’s settings page. To add a new stage, click New or choose one from the list.
Choose Helpdesk: Ticket Rating Request as the template in the Email Template field on the stage’s settings page. There are preconfigured ratings in this template that consumers can utilize to leave feedback. Click the arrow button to the right of the field to view the template.
When a ticket is moved to a stage after the template has been applied, it immediately sends out a notification. Next, clients are invited to use colored icons to score the level of service they received.
Green happy face: content
Yellow Face : Okay, Neutral
Red furrowed brow: Disgruntled
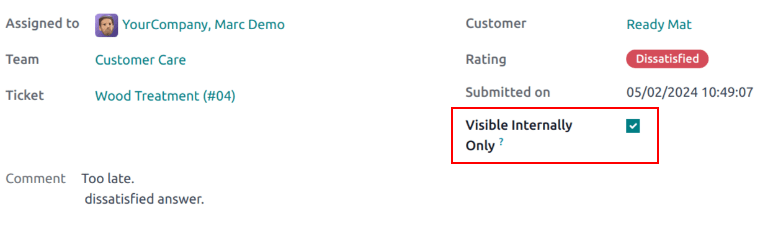
Customers are sent to a homepage where they can submit detailed written input to support their rating after choosing a rating. After that, the rating is sent in and gets added to the conversation on the ticket along with any other remarks.
Manually hide each rating
It is possible to manually conceal specific ratings from the portal. This makes it possible to exclude certain ratings from the performance measurements that are distributed to clients.
Go to the rating page to hide a rating from anyone outside of the company. There are several ways to go about doing this:
To view a specific rating, navigate to Helpdesk app ‣ Reporting ‣ Customer Ratings and select a Kanban card.
Open the Helpdesk app.‿ Tickets ‣ All Tickets, then clear the search bar’s Open filter. Next, sort by Okay, Dissatisfied, and/or Satisfied. Pick a ticket from the list of outcomes. Press the “Rating” smart button.
Check the Visible Internally Only box once you’re on the rating details page.