





Odoo Cross-Docking Workflow
Workflow Overview
Cross-docking is a warehouse fulfillment process in which products received from a supplier are moved directly toward an outgoing customer shipment without being stored in the warehouse's normal stock location.
Instead of receiving products, putting them away into stock, and later picking them for delivery, the warehouse receives the products into an Input location, transfers them to an Output location, and then ships them to the customer.
Configuration Required
The standard Odoo Cross-Docking configuration starts by enabling Multi-Step Routes and configuring both incoming and outgoing shipments to use two steps. Odoo then provides the Cross-Dock route for the warehouse.
The configuration starts with:
Enable Multi-Step Routes
The Multi-Step Routes feature must be enabled before configuring the warehouse for Cross-Docking.
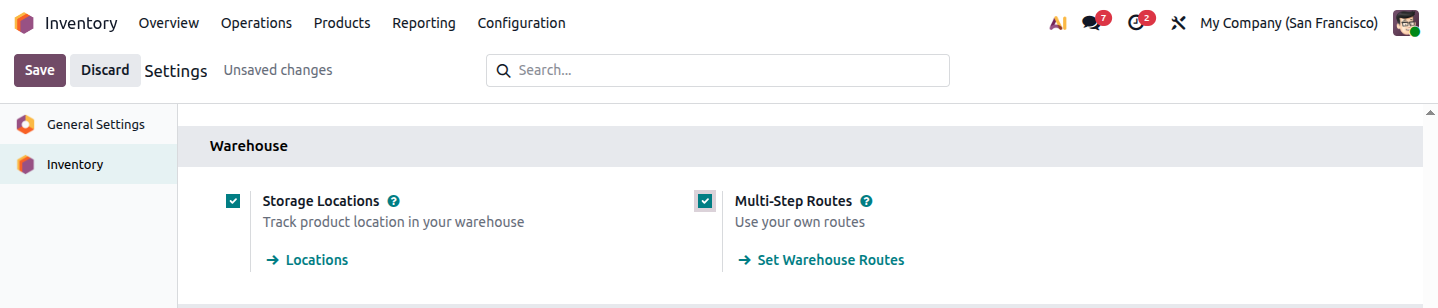 Screenshot :- multi_route.png
Example:
Suppose your company receives Black Screens from vendor and later ships them to customer. By enabling Multi-Step Routes, Odoo can use separate warehouse locations such as WH/Input and WH/Output, which are required for the cross-docking process.
Under the Warehouse section, enable: Multi-Step Routes
Then click Save.
Enabling Multi-Step Routes also enables Storage Locations, which are required to manage locations such as Input, Stock, and Output.
Configure the Warehouse for Two-Step Incoming and Outgoing Shipments
Cross-Docking requires both incoming and outgoing shipments to use two-step operations so that Odoo creates separate WH/Input and WH/Output locations.
Open the warehouse that will use Cross-Docking.
Configure:
Incoming Shipments: Receive then Store (2 steps)
Outgoing Shipments: Pick then Deliver (2 steps)
For Cross-Docking, the product can instead move directly from the receiving area to the outgoing area:
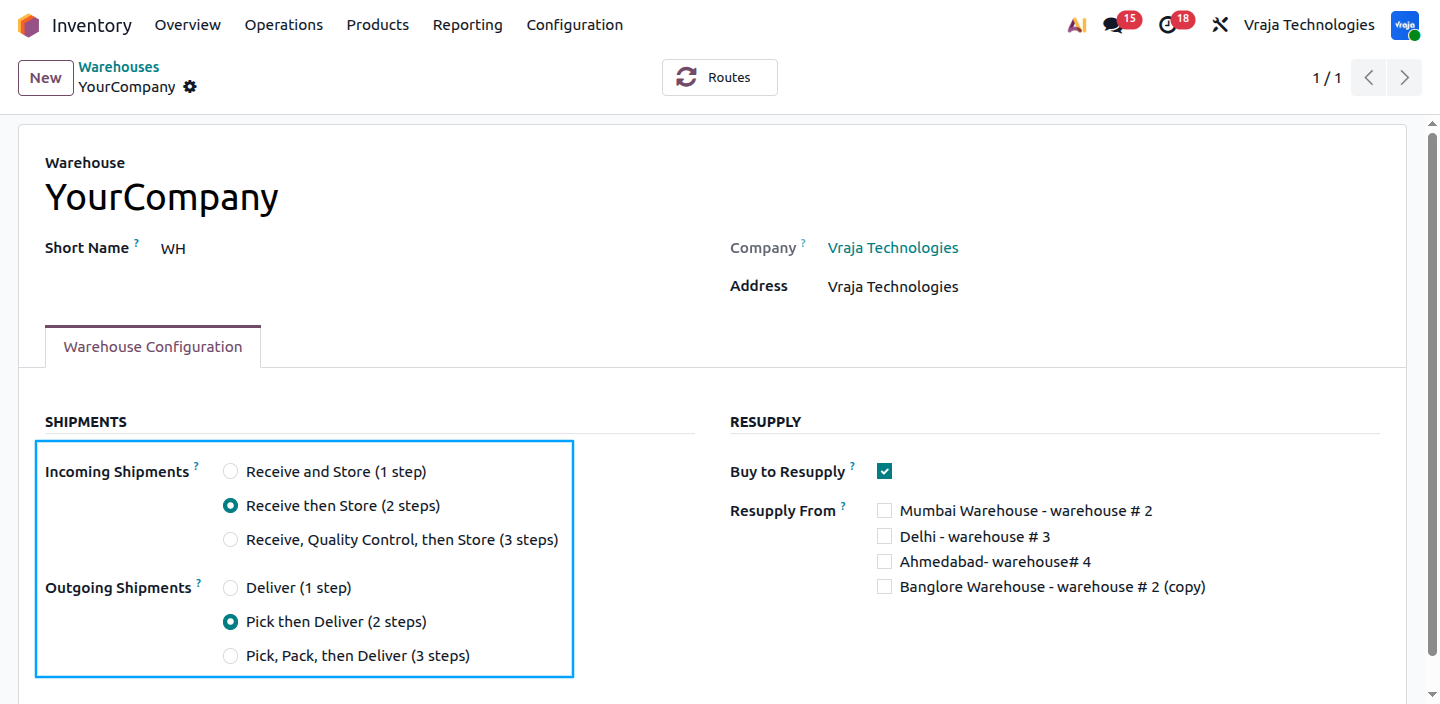 Screenshot warehouse_config.png
Creating and configuring the route :-
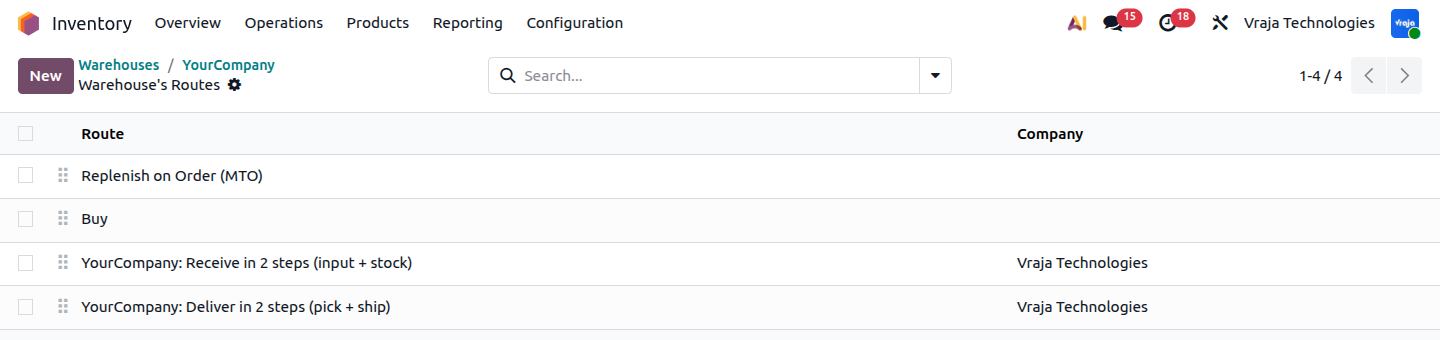 image :- 3_wh_route.png
Example:-
Suppose customer orders products, but the products are not available in your warehouse. The Cross-Dock route tells Odoo how these products should move through the warehouse once they are purchased and received.
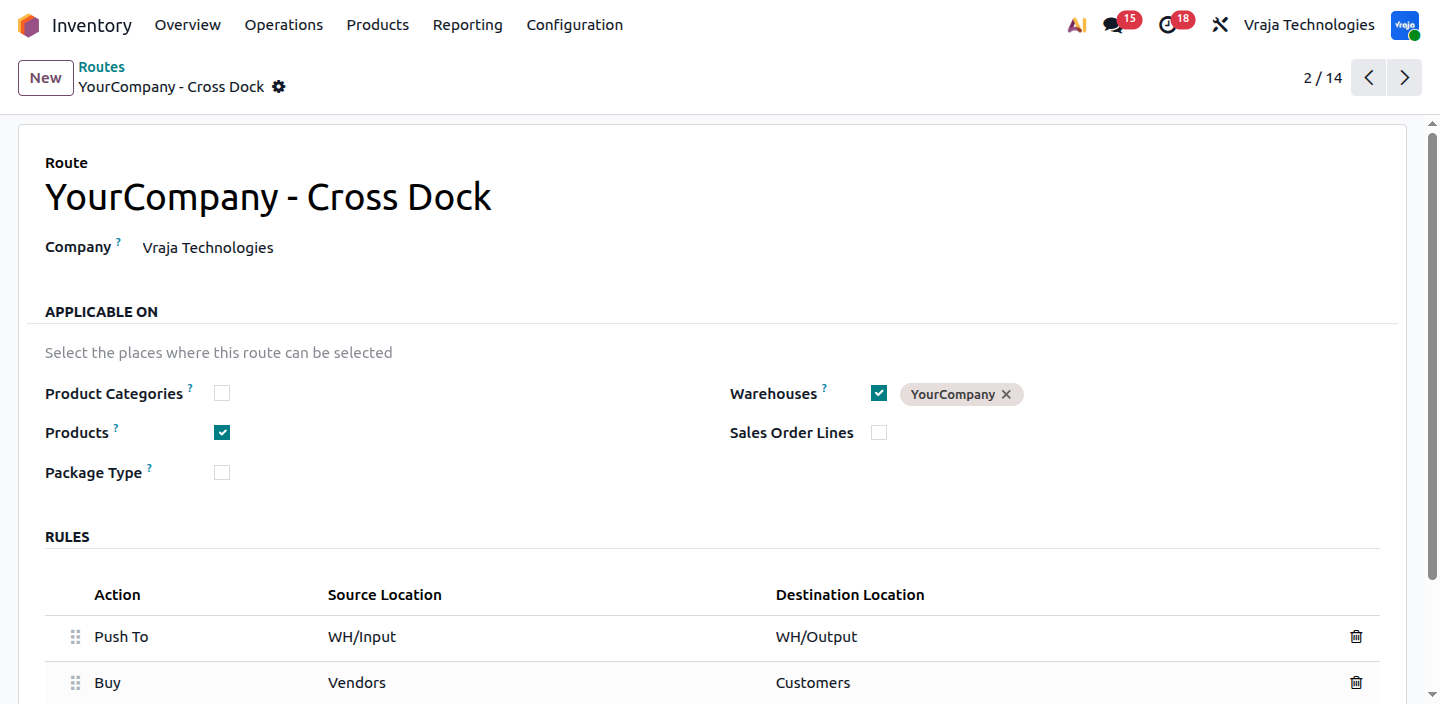 image :- 4_route.png
In the route configuration, enter a suitable name that clearly identifies its purpose, such as “YourCompany: Cross-Dock”. Using a descriptive route name makes it easier to identify and manage the route when multiple warehouse routes are configured.
After creating the route, the next step is to define the rules that determine how products should move through the warehouse. These rules specify the source location, destination location, and the operation that Odoo should perform when the route is applied.
For a Cross-Docking workflow, the rules should be configured to support the movement of incoming products toward the required outbound location instead of keeping them in regular warehouse stock. This allows the route to control the product flow from the receiving area toward the delivery process and ultimately to the customer.
Adding rules in route :-
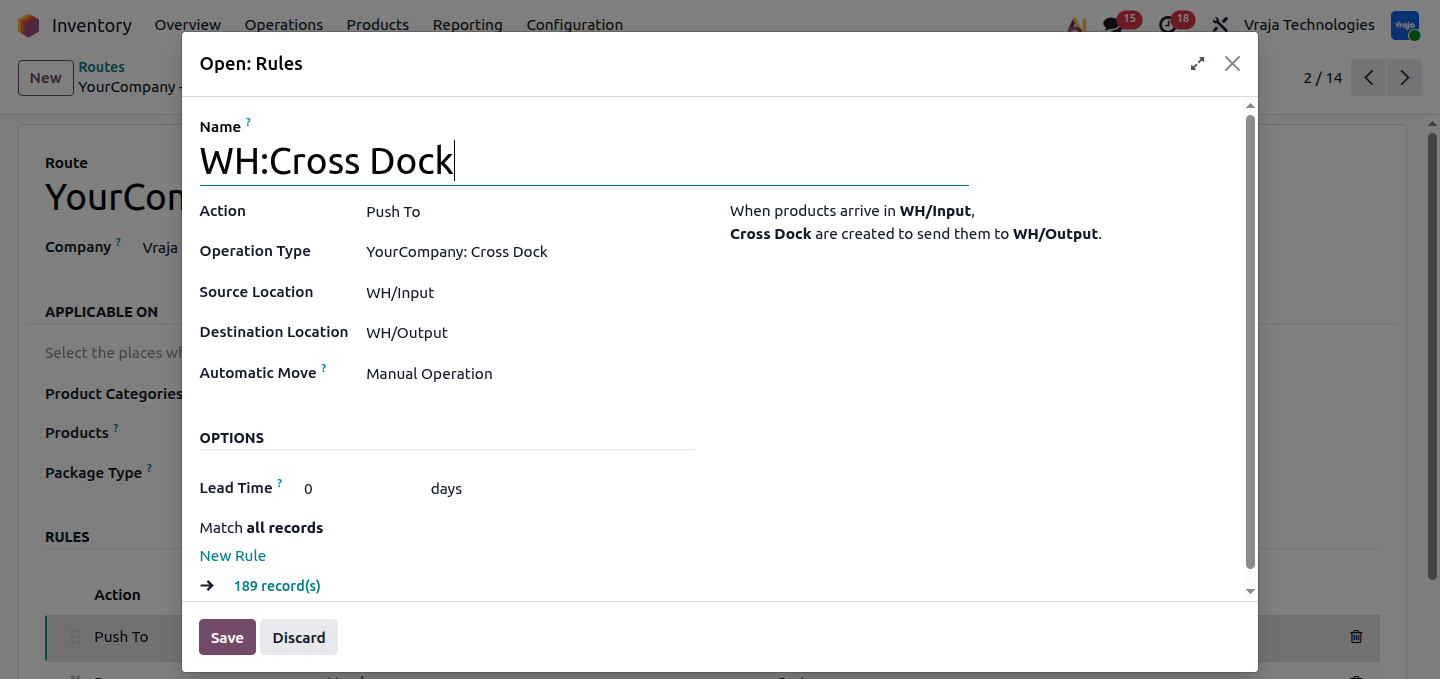 Image :- 5_push_rule.png
Example:
When the product arrive at WH/Input, the Push rule detects the products and creates the required internal movement from WH/Input → WH/Output. This prevents the products from being moved into regular warehouse stock.
The first rule can be configured to control the movement of products from the receiving area to the outbound area. Give the rule a clear name, such as “WH: Cross-Dock”.
Set the Action to Push To and select YourCompany: Cross Dock as the Operation Type. Configure WH/Input as the Source Location and WH/Output as the Destination Location.
With this configuration, products reaching WH/Input can trigger the Cross-Dock operation and move toward WH/Output without being stored in the regular warehouse stock location. This helps maintain a direct flow for products that are intended for immediate outbound delivery.
The second rule in the route is “Buy,” with the Action set to Buy and the Operation Type configured as YourCompany: Receipt, and Destination Location is set to the Customers. This rule automatically generates a Request for Quotation (RFQ) when products are required to fulfill customer demand, ensuring that purchasing is aligned with sales requirements. After configuring both rules, save the route configuration.
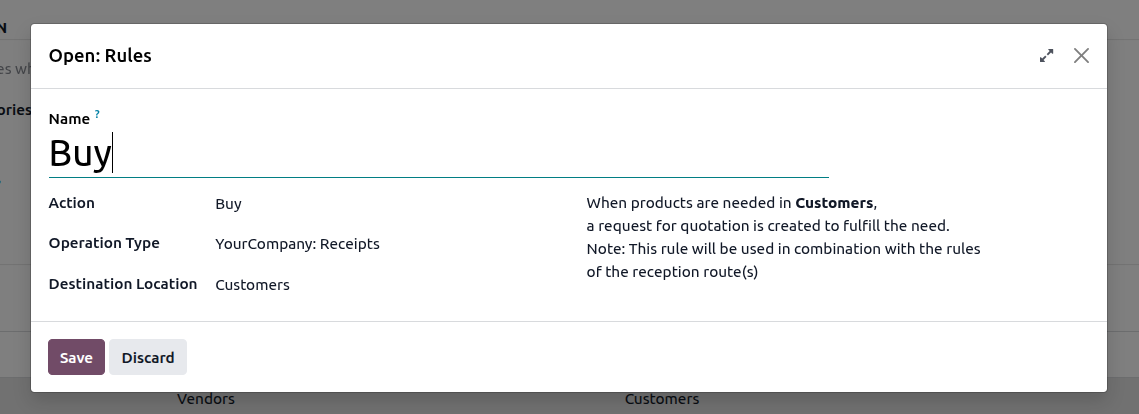 image :- 6_buy_rule.png
Example
If customer orders products and there is no available stock, the Buy rule creates a purchasing requirement. Odoo can then generate an RFQ for the configured vendor, to supply the required quantity.
Configure route and vendor in the product :-
Once the cross-docking route is created, it must be assigned to the relevant products. Navigate to Inventory → Products, open the required product, and assign the newly created cross-docking route to it.
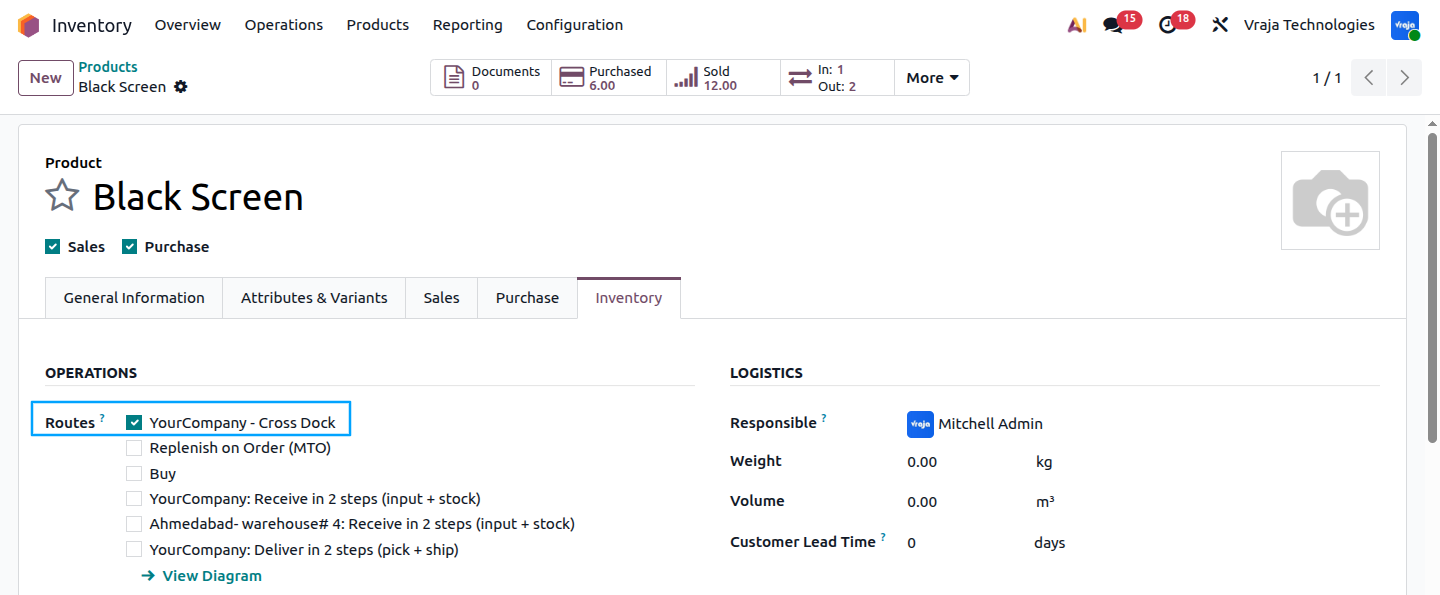 image :- 7_product_config.png
Under the product’s Inventory tab, enable the Cross-Docking routes. These settings ensure that the product follows the configured cross-docking workflow and automatically triggers the required purchasing process when needed. Finally, save the changes before exiting the product form.
Open the product’s Purchase tab and add the vendor from whom the product will be sourced. For this example, select Azure Interior as the vendor. The configured vendor is then used by Odoo to determine the supplier when the Buy rule creates a purchasing requirement.
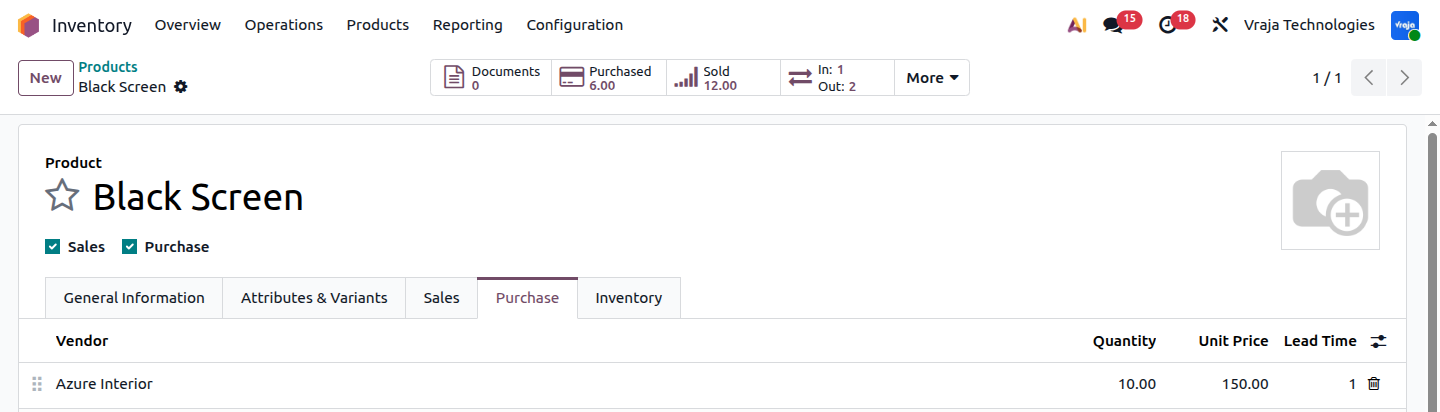 Image :- 8_purchase_config.png
example :-
For the Black Screen product, Azure Interior is configured as the vendor. When Odoo needs to purchase Black Screens through the Buy rule, it can use Azure Interior as the supplier for the purchase requirement.
Complete Workflow of Cross-Docking :-
Create a Sales Quotation by selecting the required customer and adding the configured product to the order line with the desired quantity. This creates the customer demand that initiates the configured cross-docking workflow.
Once the quotation is confirmed, Odoo automatically processes the required procurement activities. A Purchase smart button appears on the sales order, indicating that a purchase order has been generated based on the configured Buy rule.
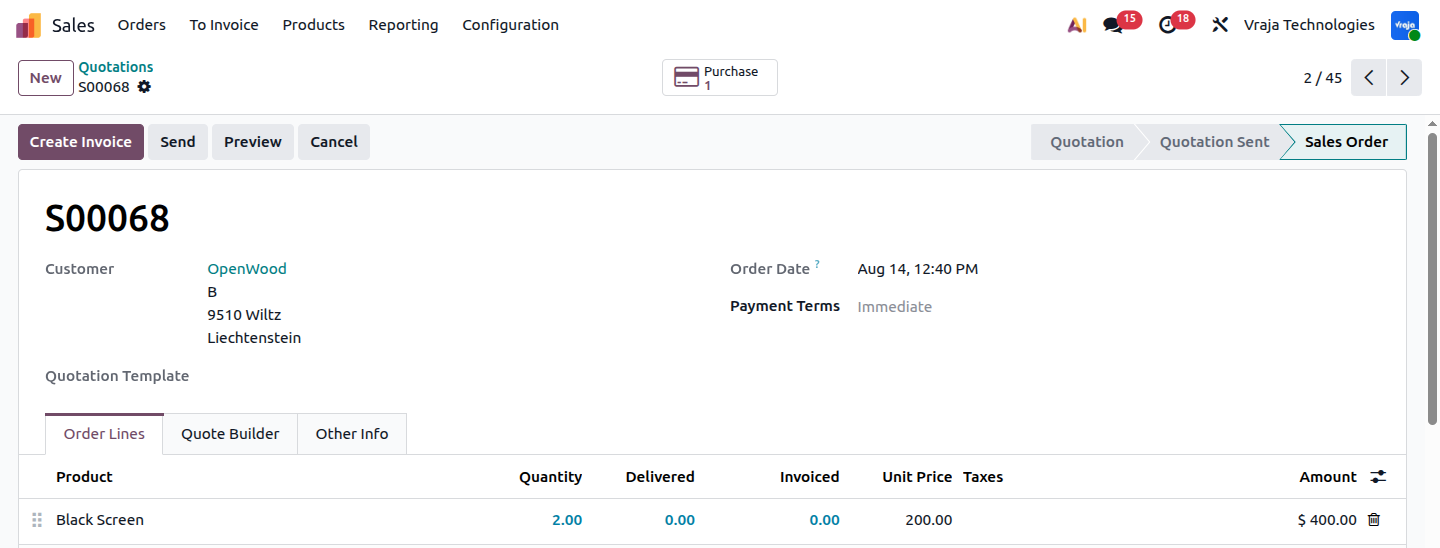 image :- 9_so.png
The generated Purchase Order can be reviewed to verify the vendor, product, and ordered quantity before confirmation. After confirming the purchase order, Odoo automatically creates the corresponding Receipt operation for the incoming products.
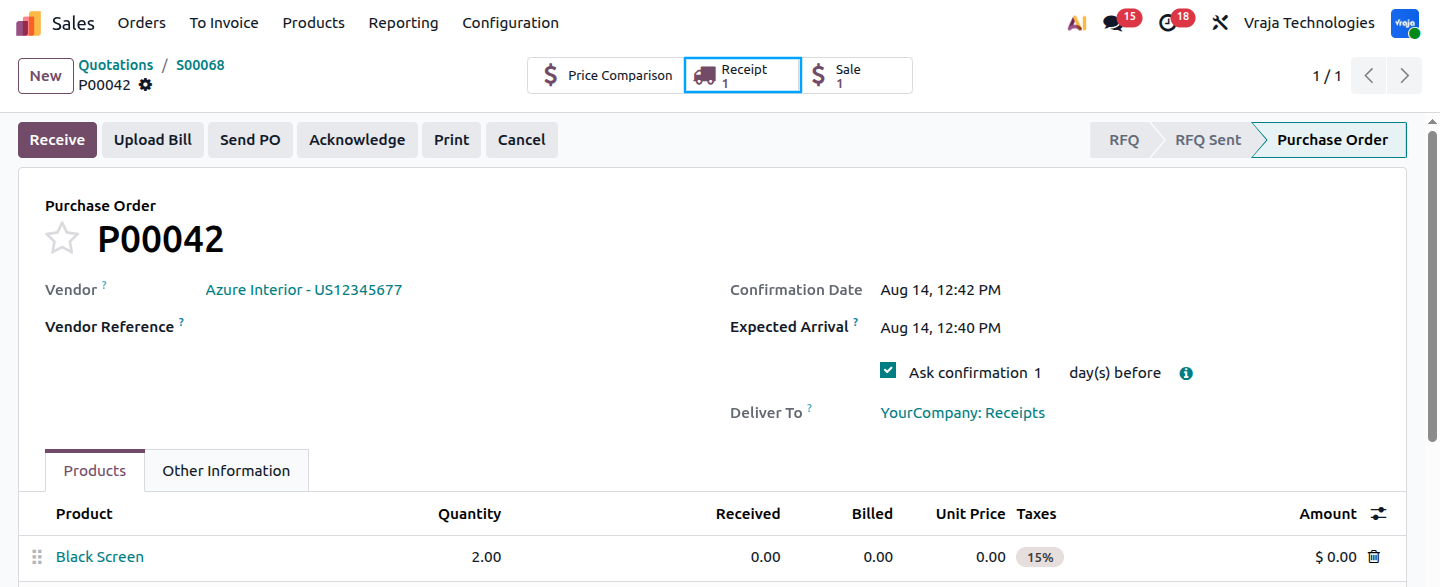 image :- 10_po.png
Once the Receipt is verify and validated, Odoo records the product as received from the vendor, Azure Interior, and moves it to the WH/Input location. The receipt’s Destination Location is therefore set to WH/Input, reflecting the first stage of the cross-docking flow. After validation, click Next Transfer to continue the product movement to the next operation.
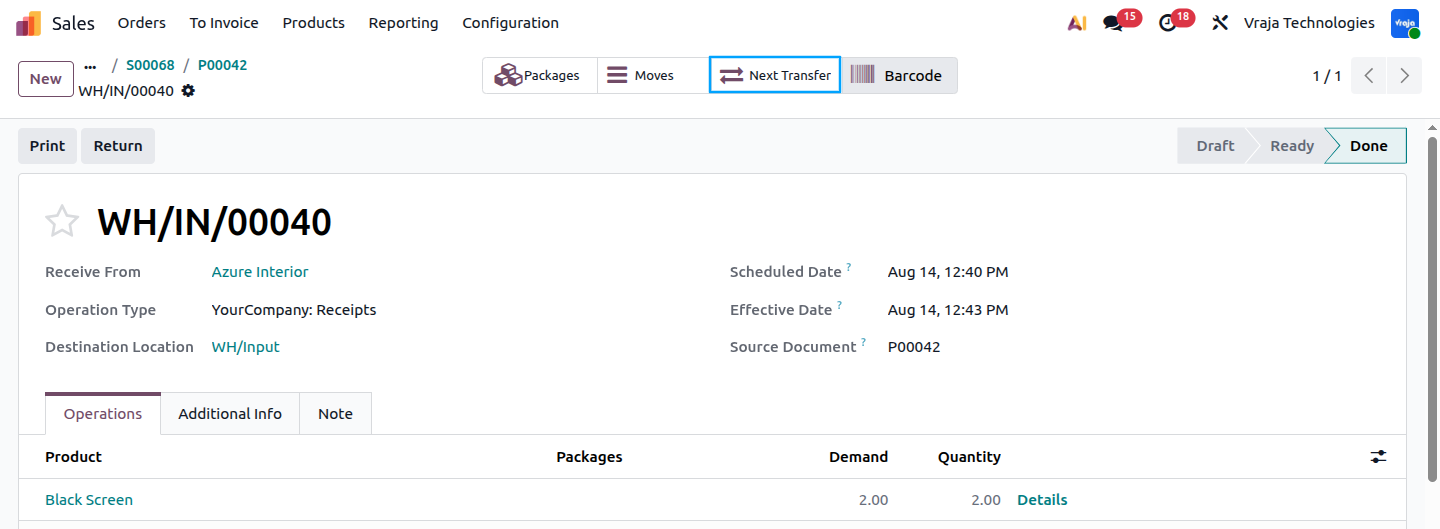 image :- 11_receipt.png
exmaple
Azure Interior delivers the 10 Black Screens to your warehouse. When the receipt is validated, Odoo records the products in WH/Input, representing the receiving stage of the cross-docking process.
The next transfer handles the internal movement required for cross-docking, transferring the product from WH/Input to WH/Output. Validating this operation moves the received product directly to the outbound staging area, bypassing regular warehouse storage.
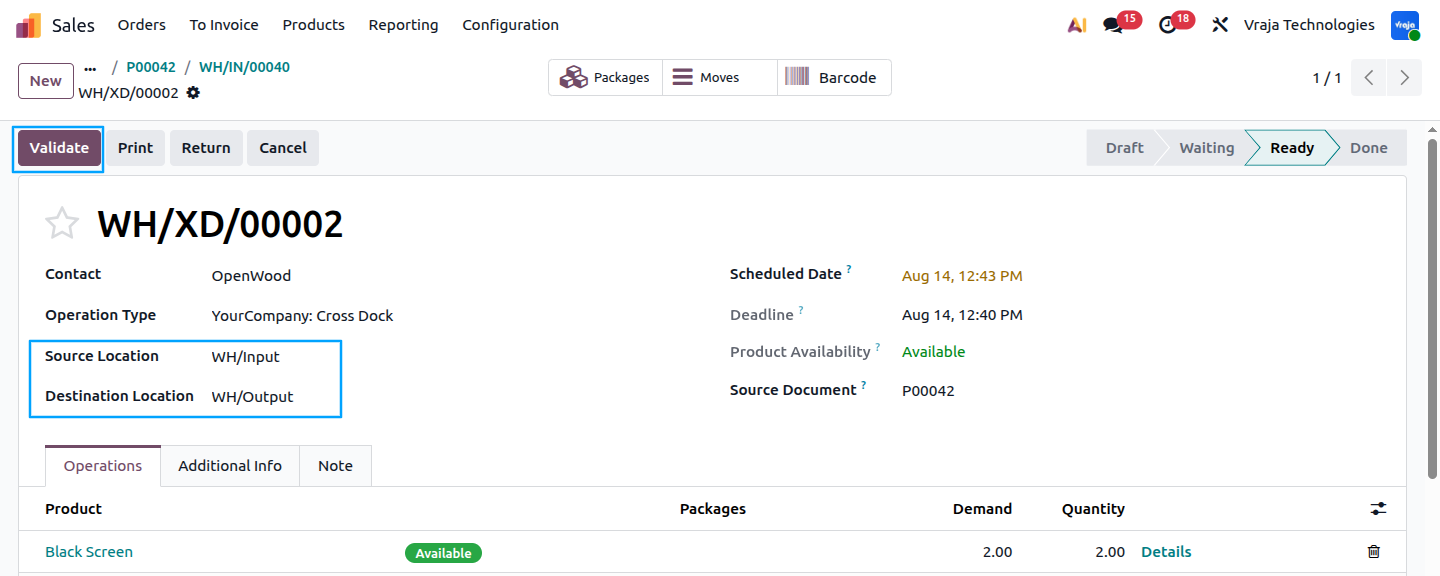 image :- 12_receipt.png
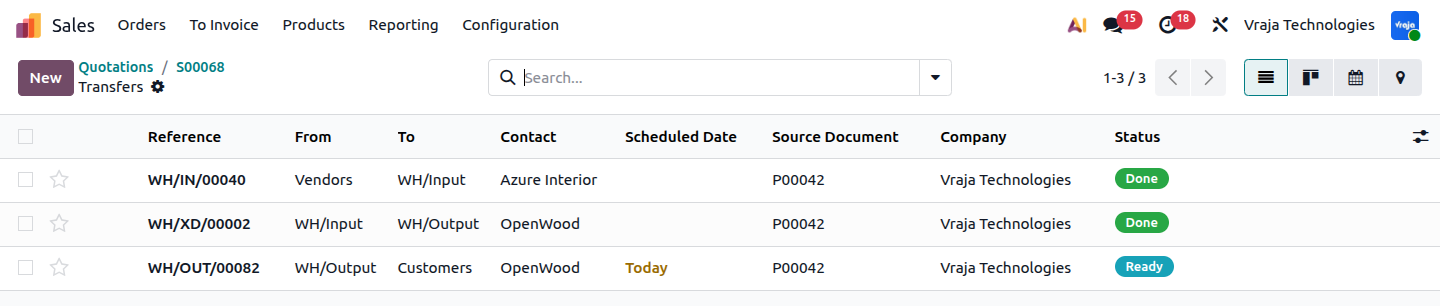 image :- 13_do.png
Example:
The Black Screens are now available at WH/Output for shipment. Before validating WH/OUT/00082, verify that the Source Location is WH/Output and the Destination Location is Customers.
Here, verify the Source Location and Destination Location before validating the final delivery, WH/OUT/00082. Once the delivery is validated, Odoo marks the product as shipped and completes the delivery to the customer.
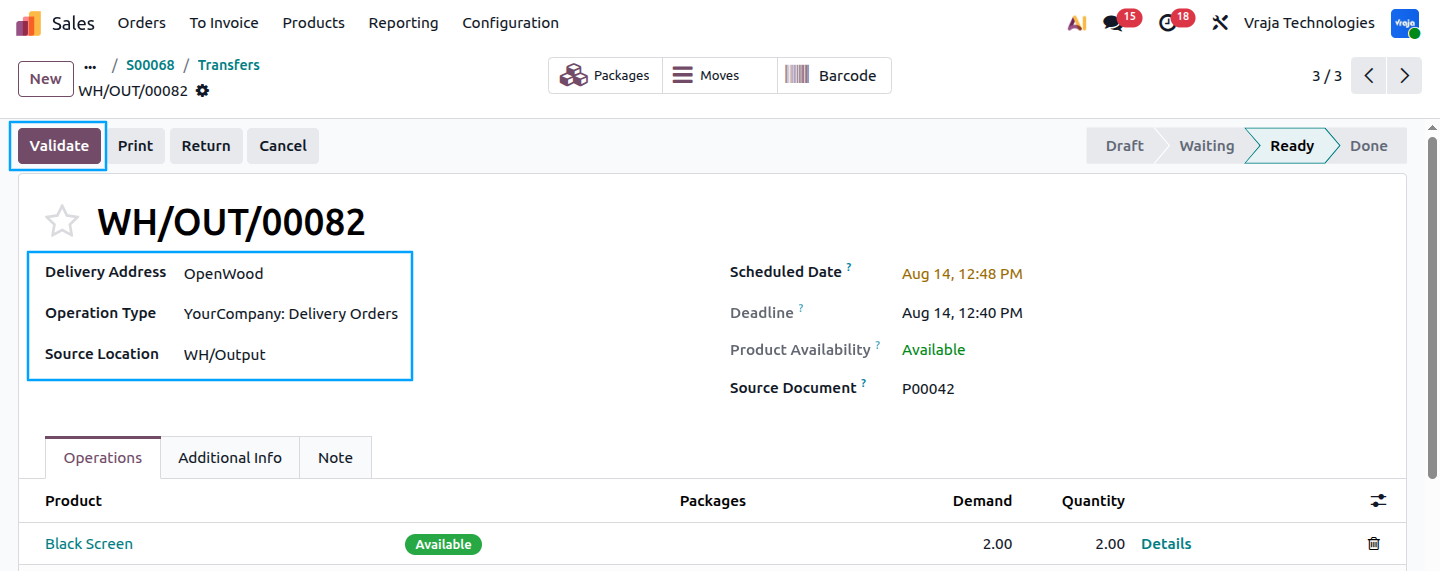 image :- 14_cusotmer_do.png
Summary
The cross-docking process automatically connects sales, purchasing, receiving, and delivery. Once a customer order is confirmed, Odoo generates the required purchase order, receives the product into WH/Input, and transfers it directly to WH/Output. Finally, the product is delivered to the customer without being stored in regular warehouse inventory.
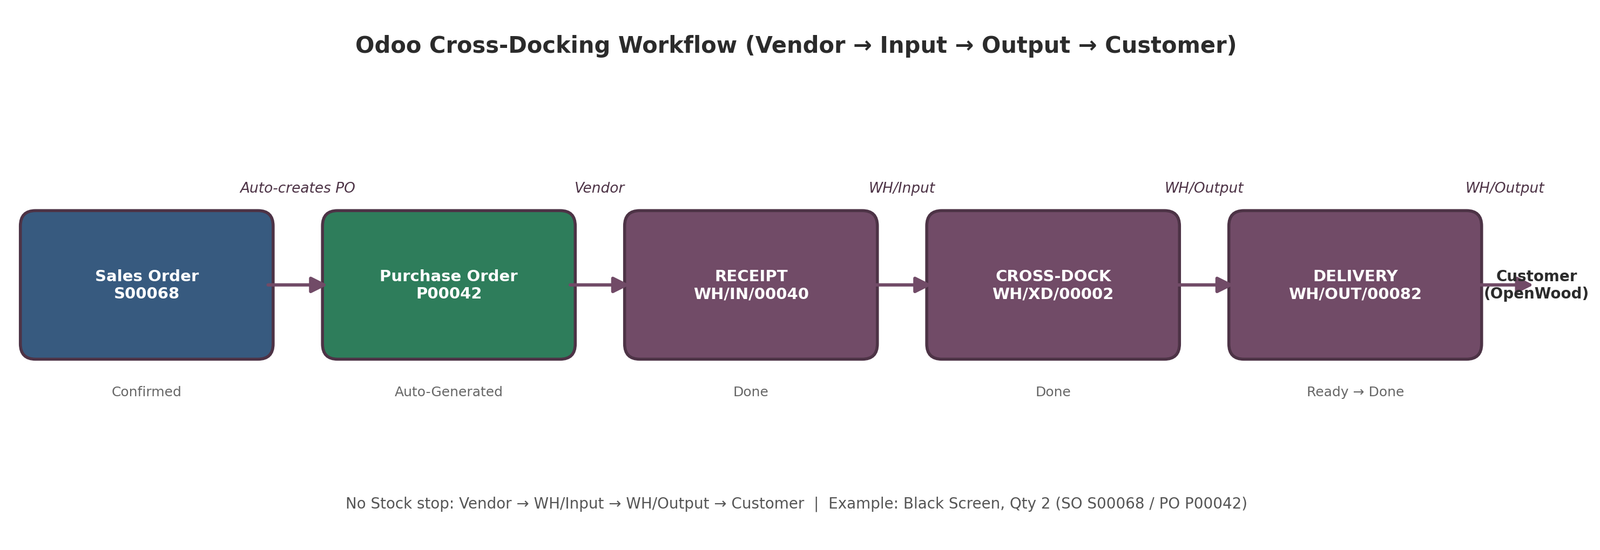 Image :- Summary.png
This diagram ties the whole process together in one view: Sales Order S00068 automatically generates Purchase Order P00042, which brings Black Screen in through Receipt WH/IN/00040 (Vendor → WH/Input), then Cross-Dock transfer WH/XD/00002 pushes it straight to WH/Output, and finally Delivery WH/OUT/00082 ships it to customer OpenWood - showing at a glance that the product never passes through WH/Stock.
SEO Section
Meta Title : "Odoo Cross-Docking Workflow"
Meta Description : Learn how Odoo's Cross-Docking route lets you receive products from a vendor and ship them straight to a customer without ever storing them in stock.
Target Keywords:
Odoo cross-docking
Odoo cross-dock route
warehouse cross-docking process
Odoo push rule
Odoo buy rule
multi-step routes Odoo
Odoo receiving and shipping
cross-dock warehouse fulfillment
Odoo procurement route
direct shipment Odoo