






Push Rules in Odoo Inventory
Workflow Overview
Odoo Inventory Rules help businesses automate how products move through warehouse locations and how inventory is replenished.
Instead of manually creating every stock transfer or monitoring inventory levels, Odoo can automatically perform inventory operations based on configured business rules.
Odoo provides three important inventory rules:
Push Rules – Move products automatically when they arrive at a specific location.
Pull Rules – Move products when a business demand is created.
Replenishment Rules – Maintain stock levels by replenishing products when inventory falls below the defined minimum quantity.
Although all three rules automate inventory operations, they are triggered by different business conditions.
Simple Difference
	Rule				|		Trigger					|			Main Purpose
------------------------|-------------------------------|--------------------------------------------
-> Push Rule			|	Product arrives				|	Move product to the next location
-> Pull Rule			|	Demand is created			|	Bring product where it is required
-> Replenishment Rule	|	Stock falls below minimum	|	Restore inventory levels
Configuration Required
1. Configure Push Rules
Push Rules are used when products should automatically move to another location after arriving at a specific location.
For example:
If every product received in WH/Input must be inspected, a Push Rule can automatically create the next movement to WH/Quality.
Open the appropriate warehouse route and go to the Rules tab.
Push Rules in Odoo Inventory
Workflow Overview
A Push Rule automatically moves products from one inventory location to another when products arrive at the configured source location.
For example, a company has two warehouses:
YourCompany Warehouse
Ahmedabad Warehouse
Suppose products are received into the YourCompany Warehouse and the business wants those products to automatically move to the Ahmedabad Warehouse.
A Push Rule can automate this movement.
The workflow becomes:
The warehouse team does not need to manually create an internal transfer after the products arrive in YourCompany Warehouse. Once the products reach the configured source location, Odoo automatically generates the next stock movement according to the Push Rule.
Odoo specifically defines a Push Rule as a rule triggered by the arrival of products at the source location, which then generates a picking to move those products to the destination location.
Example Business Scenario
Consider a company that operates two warehouses:
YourCompany Warehouse
This warehouse receives products from suppliers.
Ahmedabad Warehouse
This warehouse is used for storing and distributing products.
The business requirement is:
Whenever selected products arrive in the YourCompany Warehouse Stock, automatically move them to the Ahmedabad Warehouse Stock.
Configuration Required
Before configuring the Push Rule, make sure both warehouses are properly configured.
1. Enable Storage Locations and Multi-Step Routes
Under the Warehouse section:
Enable Storage Locations
Enable Multi-Step Routes
Then click Save.
Odoo uses Storage Locations together with Multi-Step Routes to control how products move between warehouse locations.
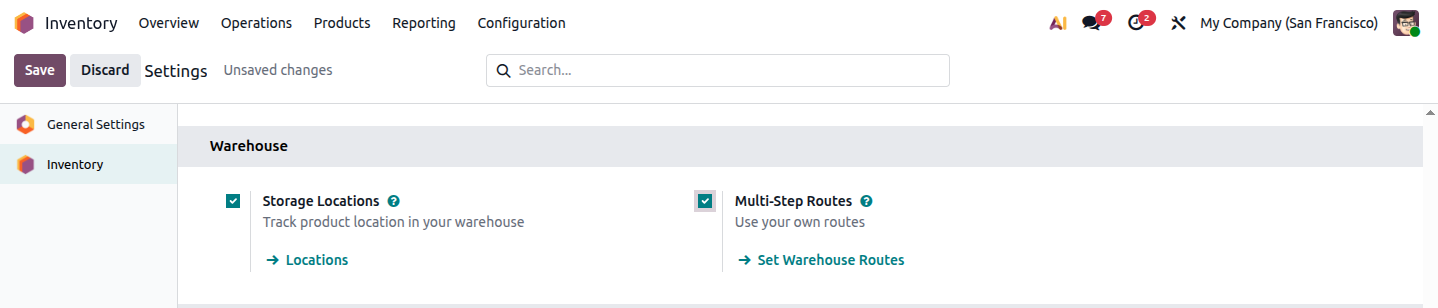 Image :- inventory-settings.png
2. Configure the YourCompany Warehouse
YourCompany Warehouse
Configure the warehouse as required for receiving products.
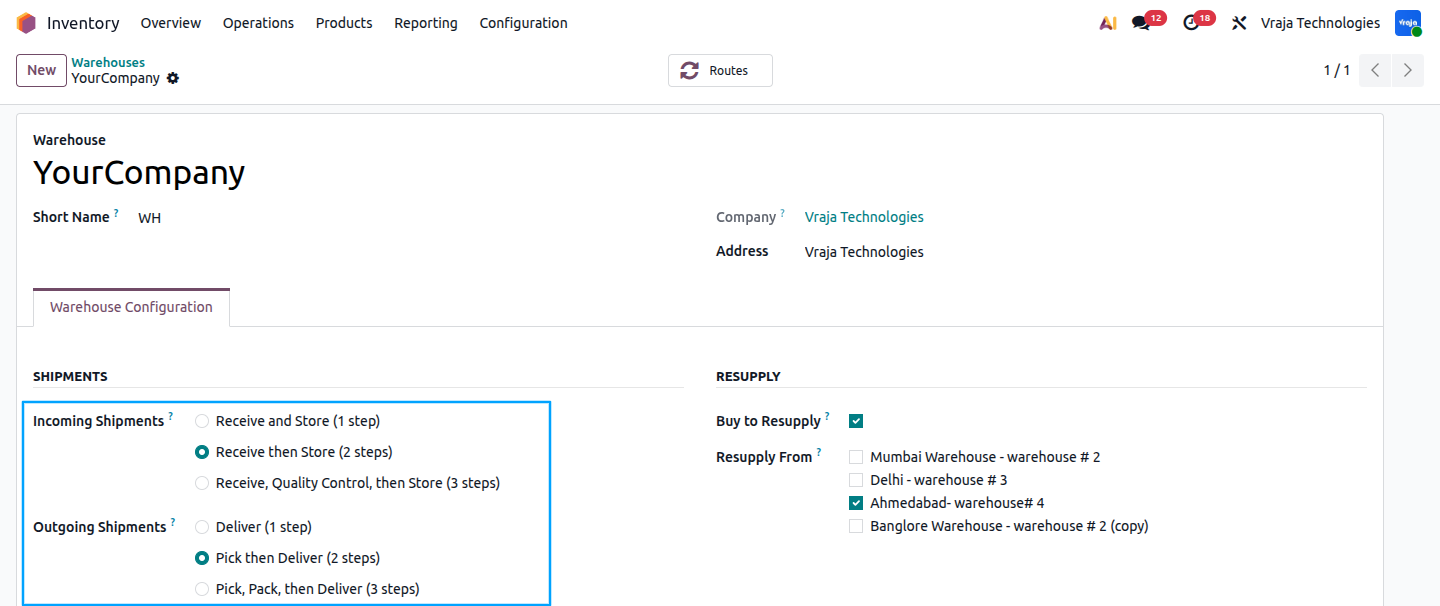 Image :- yourcompany-warehouse.png
3. Configure the Ahmedabad Warehouse
Now configure the second warehouse.
Open: Ahmedabad Warehouse
Make sure it has its own:
Odoo creates warehouse-specific locations and operation types based on the warehouse setup.
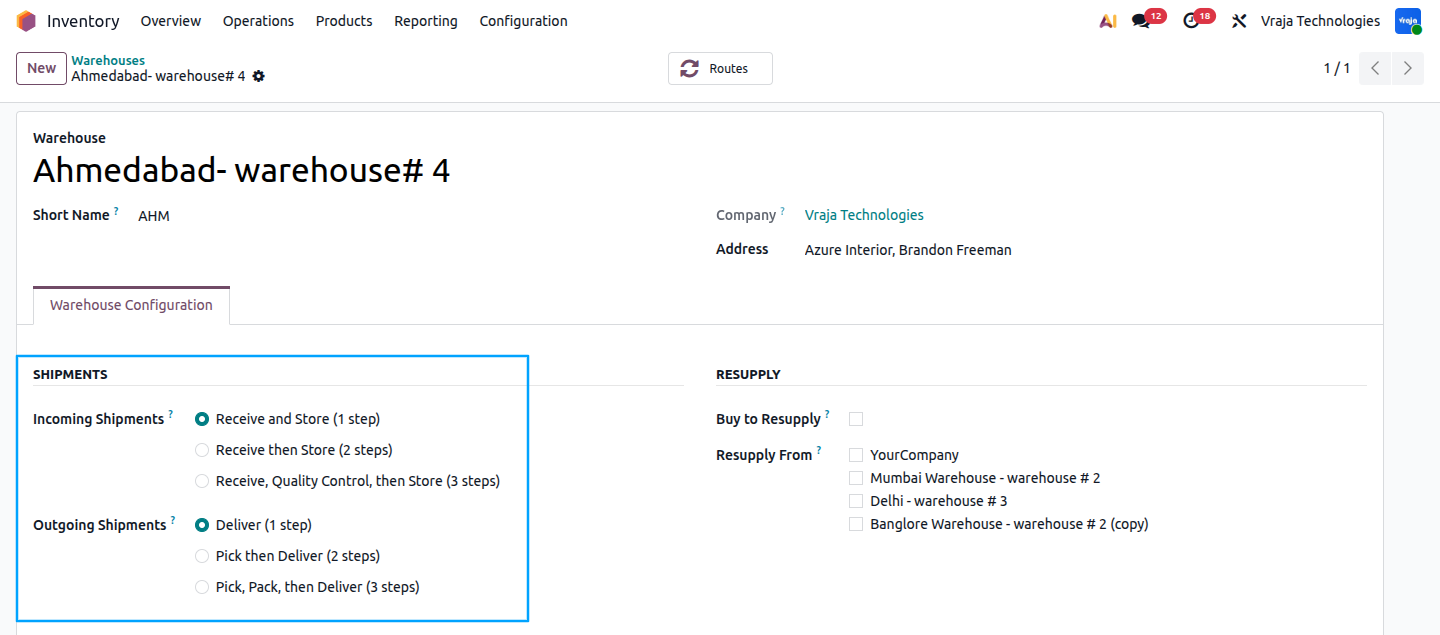 Image :- ahmedabad-warehouse.png
4. Create a Custom Push Route
Now create a separate route for the automatic movement.
Click: New
Enter: Route Name: e.g(YourCompany: Push Stock to Ahmedabad)
Configure the required route information, then go to the Rules tab and click Add a line to create the Push Rule.
Add a line
Configure the rule as follows:
Field						|			Configuration
----------------------------|-------------------------------
Action						|			Push To
Source Location				|			WH/Stock
Destination Location		|			AHM/Stock
Operation Type				|			Internal Transfer
Push To
WH/Stock → AHM/Stock
This tells Odoo:
When the configured product arrives at WH/Stock, automatically create a transfer to AHM/Stock.
Odoo's Push To action is specifically triggered by product arrival at the defined source location.
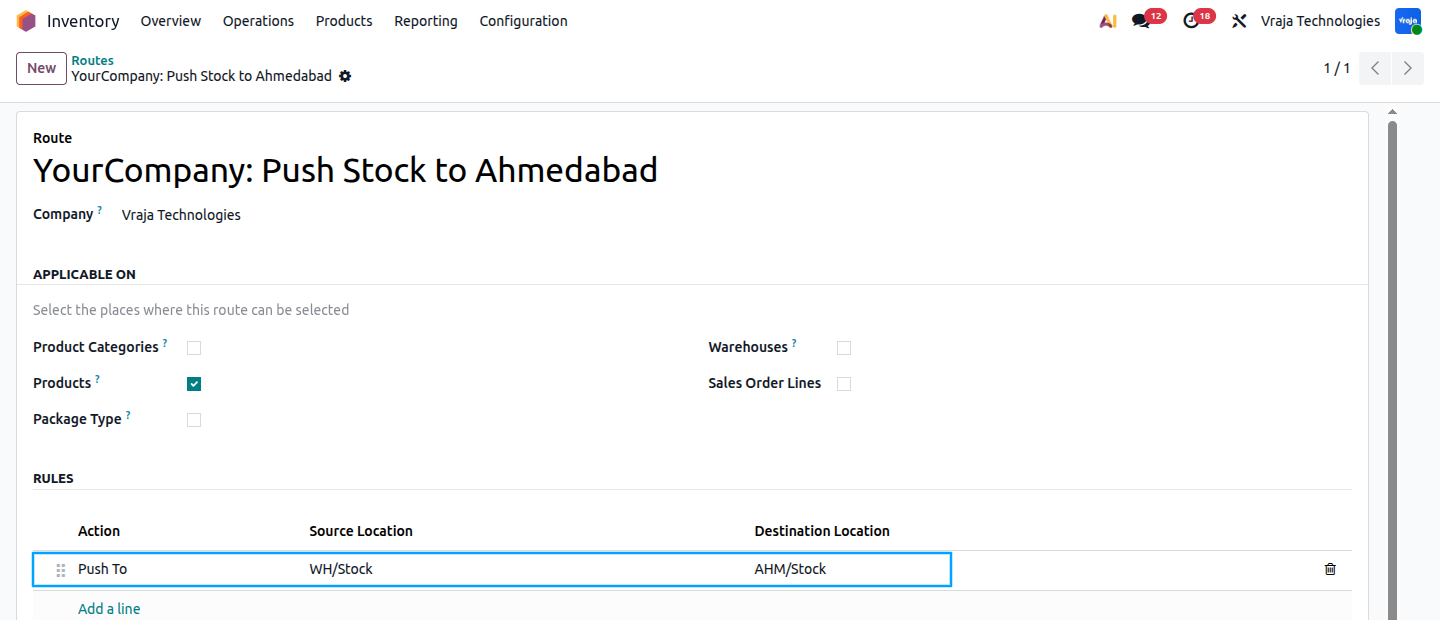 Image :- push-rule-configuration.png
5. Configure the Operation Type
The Push Rule also needs an operation type because this determines what kind of inventory transfer Odoo creates.
For an inter-warehouse movement, use an Internal Transfer operation type.
Open the appropriate internal transfer operation type.
Verify that it is configured for internal stock movements.like source location or destination location.
The Push/Pull rule configuration includes an Operation Type, which determines the type of picking created by the rule.
Screenshot
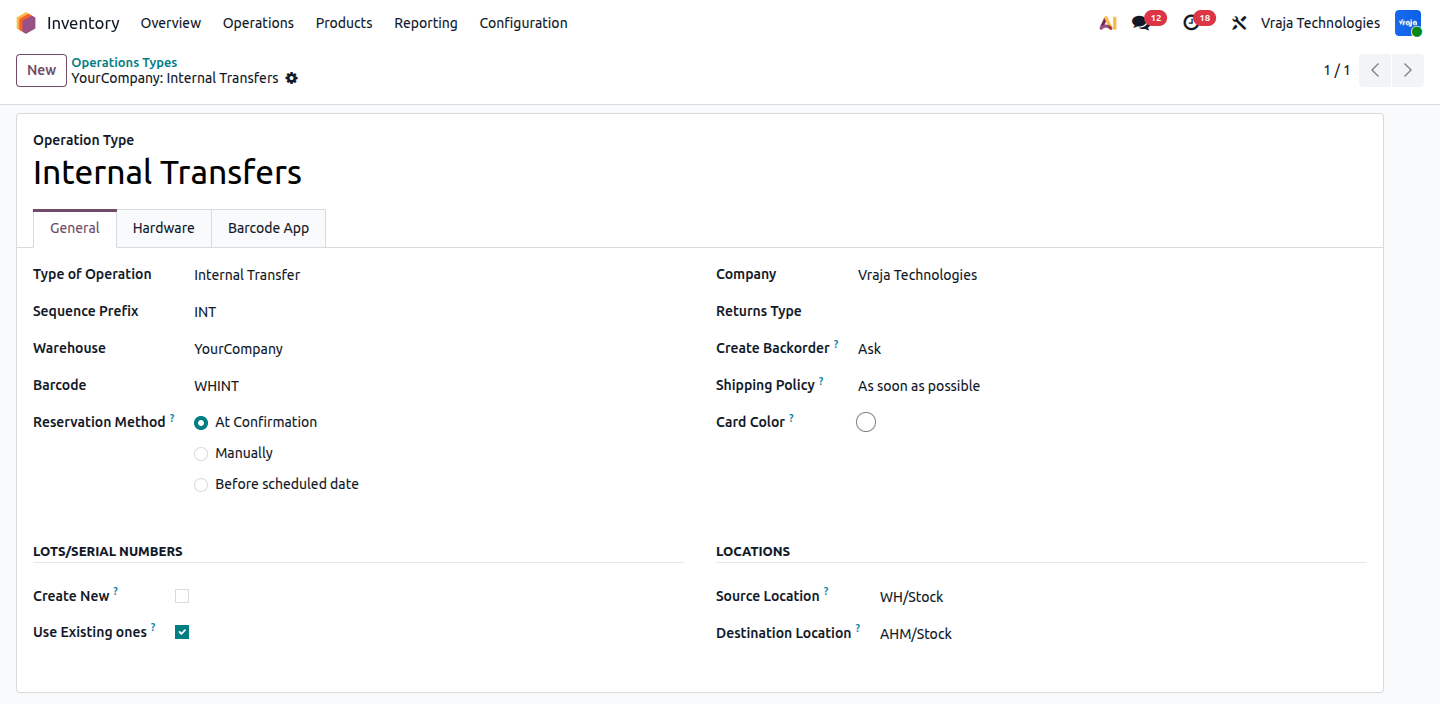 Image :- internal-transfer-operation.png
6. Configure the Product
Now decide which products should follow this Push Rule.
Open the required product.
Go to the: Inventory tab.
Under: Operations → Routes
select: YourCompany: Push Stock to Ahmedabad
Then click: Save
This is important because you generally do not want every product entering YourCompany Warehouse to automatically move to Ahmedabad. Applying the route to the required products gives you control over which products follow the Push workflow.
Odoo routes can be applied to products and product categories, among other supported locations.
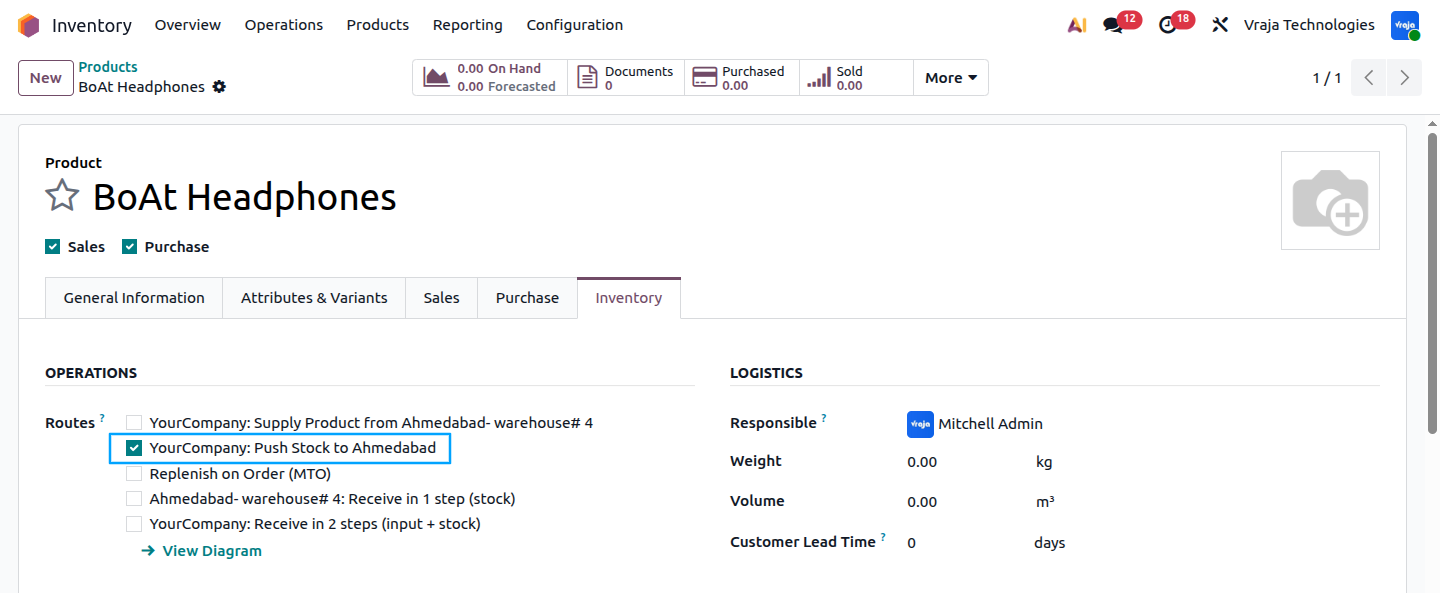 Image :- product-push-route.png
Complete Transaction Workflow
Now that the warehouse and Push Rule are configured, you can demonstrate the complete transaction.
Step 7: Create a Purchase Order
Create a quotation for the supplier.
For example:
Product: Boat Headphones
Quantity: 15
Vendor: Lightsup Supplier
Confirm the Purchase Order.
Odoo creates the corresponding receipt for YourCompany Warehouse.
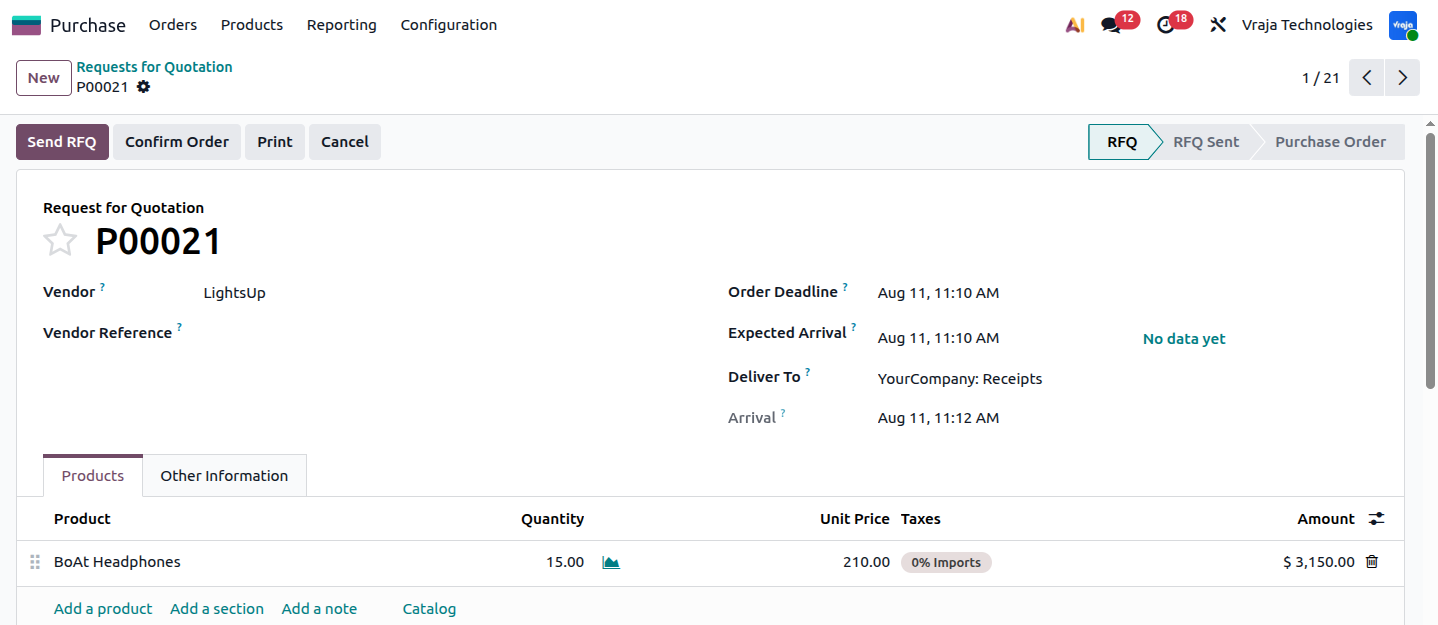 Image :- purchase-order.png
Step 8: Receive Products into YourCompany Warehouse
After confirming the Purchase Order, open the receipt.
Because YourCompany Warehouse is configured for a 2-Step Receipt, the incoming process is:
The first receipt moves the products into: YourCompany WH/Input
Screenshot
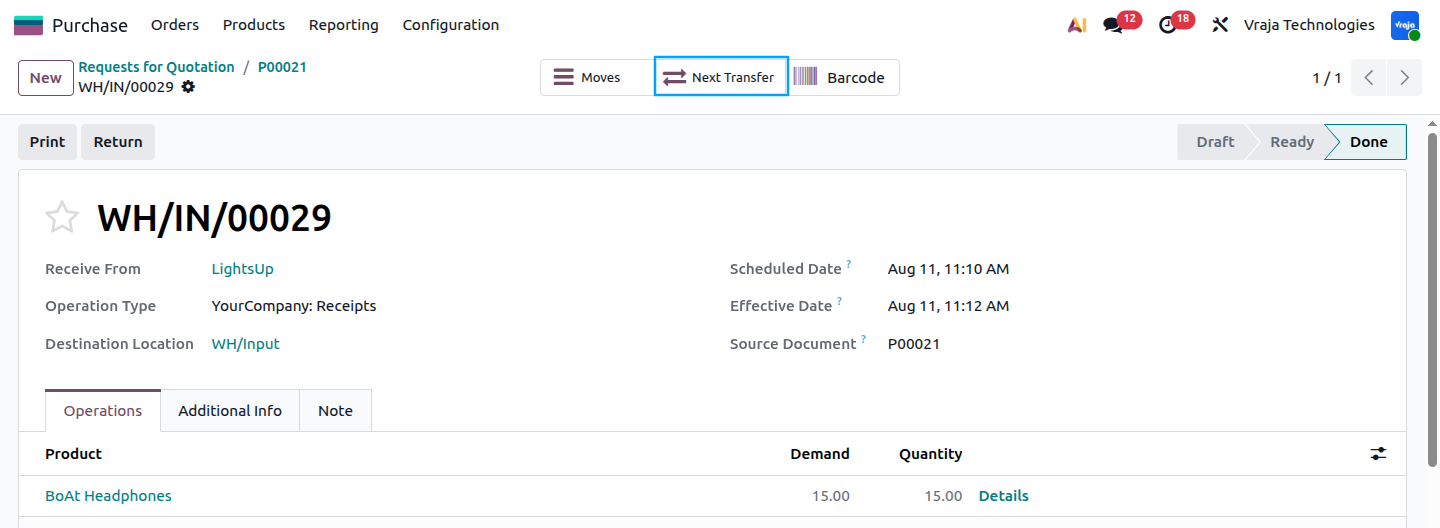 Image :- yourcompany-receipt-input.png
Step 9: Validate the Receipt into YourCompany Stock
After the first receiving operation is completed, the next operation moves the products from: WH/Input → WH/Stock
Open and validate this storage transfer.
Screenshot: yourcompany-stock-receipt.png (this shows WH/STOR/00002 — the 2-step receipt's storage leg, Source: WH/Input, Destination: WH/Stock)
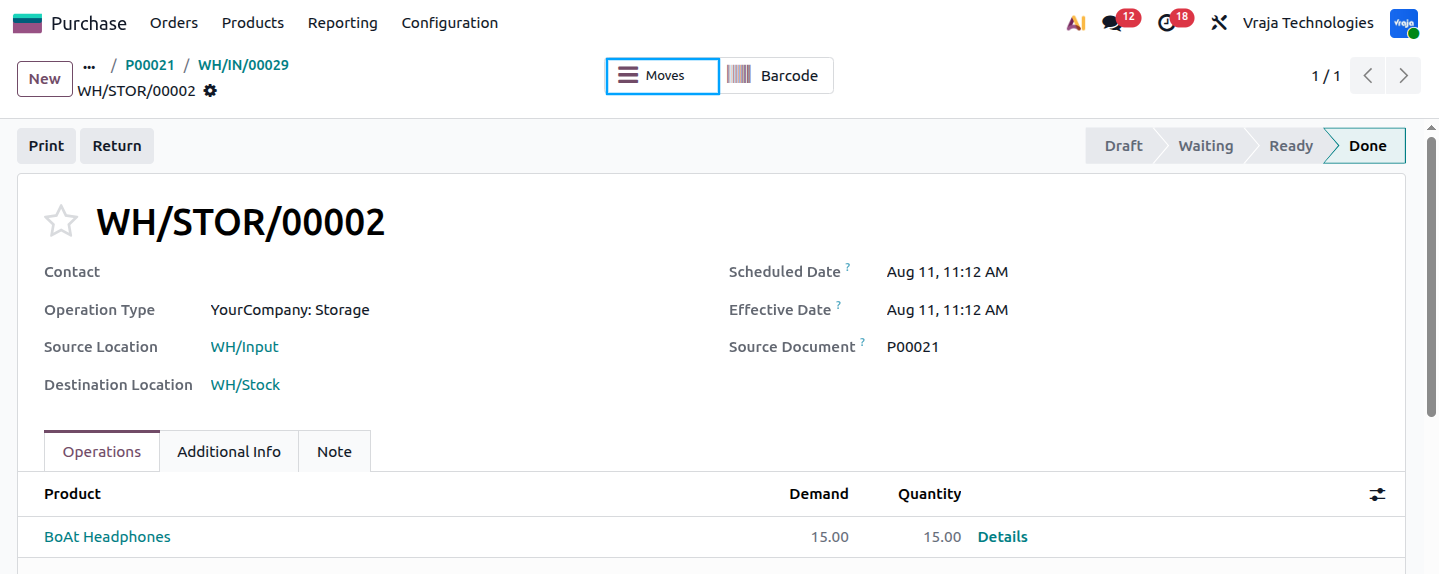
Step 10: Push Rule Triggers Automatically
Once WH/STOR/00002 is validated and stock arrives in WH/Stock, Odoo automatically creates a new Internal Transfer based on the configured Push Rule.
you can also verify the Push Rule worked by checking the destination location directly.
Select the location used in the Push Rule's destination — AHM/Stock.
Click on the product to views its current stock, then search for your product (BoAt Headphones).
You'll see the product now listed directly under AHM/Stock, confirming that Odoo automatically moved it there via the Push Rule — without any manual transfer.
The configured rule is:
WH/Stock → AHM/Stock
Therefore, Odoo automatically creates the next internal transfer.
The warehouse employee does not need to manually create the transfer.
┌──────────────────────────────┐
│      PURCHASE ORDER          │
│     Supplier → Company       │
└──────────────┬───────────────┘
               ↓
┌──────────────────────────────┐
│   YOURCOMPANY WAREHOUSE      │
│          WH/Input            │
└──────────────┬───────────────┘
               ↓
┌──────────────────────────────┐
│       YOURCOMPANY STOCK      │
│          WH/Stock            │
└──────────────┬───────────────┘
               ↓
          PUSH RULE
               ↓
┌──────────────────────────────┐
│      INTERNAL TRANSFER       │
│      WH/Stock → AHM/Stock    │
└──────────────┬───────────────┘
               ↓
┌──────────────────────────────┐
│   AHMEDABAD WAREHOUSE        │
│          AHM/Stock           │
└──────────────────────────────┘